- v1.0.0-latest-prod
The following recipes are applicable to initializr/manifest-based projects (Release Train 1.8.4+) and requires credentials to access various Broadleaf resources referenced in Getting Started Locally. Please read this section and have the appropriate local environment setup configured before proceeding.
The following recipes are catered to mature DevOps operational teams looking to manage and support a Broadleaf implementation themselves. This section provides operational recipes and guides for common tasks related to setting up, managing, and operating a Broadleaf Microservices ecosystem.
For those that would like support with DevOps and operational concerns related to working with a Broadleaf implementation, Broadleaf provides a fully managed cloud offering called Broadleaf Cloud as well as DevOps Managed Support Services. These offerings provide many benefits including a fully managed pipeline catered to building out a Broadleaf ecosystem. More details on other capabilities that we can provide in this area can be found here.
Audience: Architects, DevOps, SRE Teams
Stage: Environment Setup
Background: Broadleaf provides a standalone security tool to help operation teams manage the necessary security artifacts that are generated for an Initializr-based Microservices project
Why: It is recommended that you generate a new set of security artifacts for every environment that Broadleaf is deployed to (e.g. Dev, QA, Production)
Assumptions:
You’ve authenticated with Broadleaf’s Nexus to obtain the necessary tools and artifacts as identified in the Getting Started Locally guide
You are working with an Initializr-based Broadleaf project structure containing a manifest
You plan to use Broadleaf’s Spring Cloud Config Server for distributed configuration property management
Optional but highly recommended - You have access to a Secrets Vault or Secrets Manager (e.g either a cloud-native offering like Google’s Secrets Manager or Azure Key Vault or a third-party solution like HashiCorp Vault) to store and maintain the source security artifacts for safe keeping
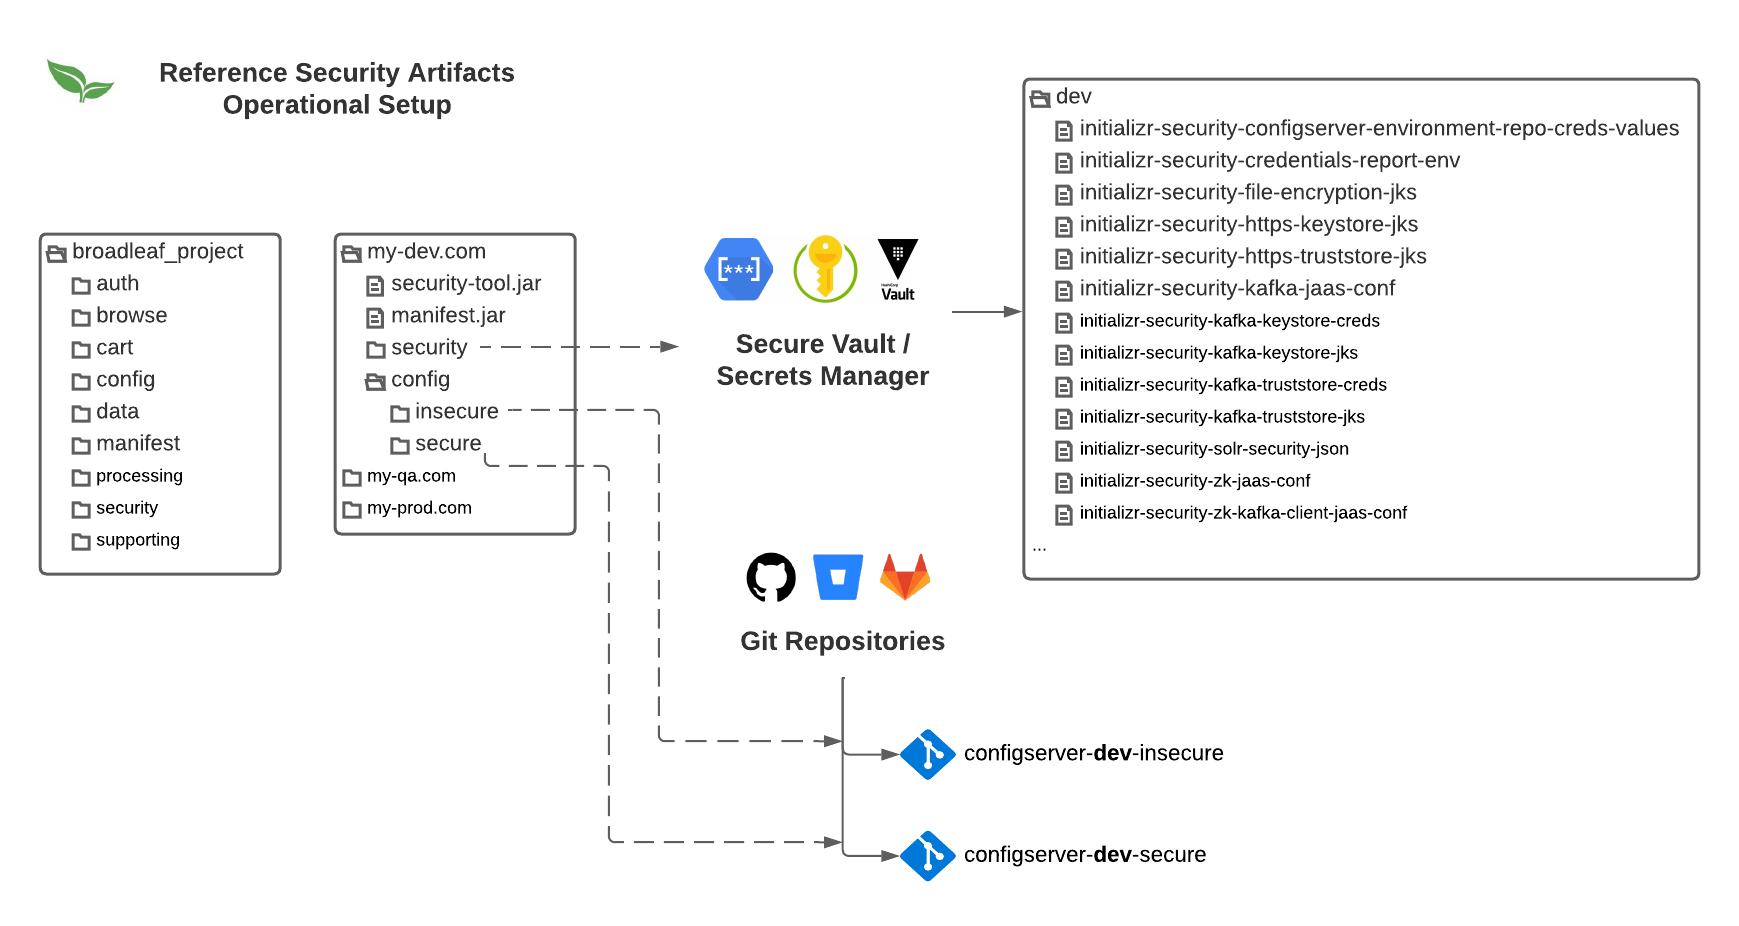
Below is a recommended local workspace setup for an operations team member. This setup supports management of multiple security artifacts for different environments. We’ll be using and referencing this setup in the following recipes.
For organizational purposes, we recommend creating a separate working directory for each environment (e.g. Dev,QA, and Production etc…) to store and generate your security artifacts
The below instructions will outline the steps necessary to prepare each of these working directories to generate and manage the security artifacts for that environment.
In order to generate the correct properties and artifacts that apply to your implementation, you will need to download the correct Security Tool version that is applicable to the starter base and release train versions defined for your project. To find this version you can execute the following Maven Command in the manifest directory of your main Broadleaf project.
./mvnw -q \
  org.apache.maven.plugins:maven-help-plugin:3.2.0:evaluate \
  -Dexpression=blc.starter.version \
  -DforceStdout
Keep note of this version as you’ll need to use this to download the correct tool version.
As you continually upgrade and update your Broadleaf implementation to reference new starter bases dependencies and new release trains, you’ll want to make sure that you download the appropriate tool version that align with the updates. You can find that congruent version by running the command above.
To download the tool, create a separate working directory for the environment you want to generate security artifacts for (e.g. my-dev.com) and take note of the path to this directory.
Next, cd into the manifest directory of your main Broadleaf project and run the following Maven dependency copy command. Make sure to replace the [replace_with_correct_version] and the [/my/local/path/to/my-dev.com] parts with the appropriate values based on what you noted from the steps above.
./mvnw org.apache.maven.plugins:maven-dependency-plugin:3.6.0:copy \
  -Dartifact=com.broadleafcommerce.microservices:broadleaf-microservices-starter-security-tool:[replace_with_correct_version]:jar \
  -DartifactId=broadleaf-microservices-starter-security-tool-downloader \
  -DgroupId=com.broadleafcommerce.microservices \
  -DoutputDirectory=[/my/local/path/to/my-dev.com] \
  -DstripVersion=true
Next, you’ll want to copy over the current Manifest JAR built for your project to your environment working directory. You can find this artifact if you cd into your manifest directory of your primary Broadleaf project. Next cd into the target directory. Note: If you do not have a target directory, you can always execute a new build by running ./mvnw clean install which should generate a new target directory with several build artifacts inside. Inside this target directory, you should find a manifest JAR (e.g. microservice-flexpackage-manifest-1.0.0-SNAPSHOT.jar). Copy this file into your environment’s working directory. For example:
cp target/microservice-flexpackage-manifest-1.0.0-SNAPSHOT.jar /my/local/path/to/my-dev.com
You should now have both a security-tool.jar and a manifest.jar in your environment’s working directory (e.g. /my/local/path/to/my-dev.com). With this in place, you are now ready to generate new security artifacts by running the following Java command (replacing the name of the security-tool.jar with the actual name of the JAR file in your directory):
java -jar security-tool.jar generate
With that command executed, you should now see new security and config folders generated in your current environment working directory.
HINT: you can always run
java -jar security-tool.jar helpto view additional command options available to you when executing this tool
While this is optional, it is highly recommended that you now store these generated artifacts in the security folder in a shared secure location (i.e. NOT in a source control system) preferably a secrets manager or vault. This allows you (or another operations team member with the appropriate access) to create a shared "source of truth" that correspond with the latest versions of these artifacts - this will help if and when you need to make changes and updates to the properties over time.
Audience: Architects, DevOps, SRE Teams
Stage: Environment Setup
Why: If you are using Broadleaf’s recommended Config Service (which is built on Spring Cloud Config), it is recommended that you configure that service with a Git backend allowing you to achieve a GitOps style operational setup. This allows both developers and operations teams to manage properties through source control. When these properties change, the config service can be configured to pick up these changes, propagate them, and make sure these updated properties are available to all the concerned microservices within the ecosystem
Assumptions:
You’ve authenticated with Broadleaf’s Nexus to obtain the necessary tools and artifacts as identified in the Getting Started Locally guide
You are working with an Initializr-based Broadleaf project structure containing a manifest
You plan to use Broadleaf’s Spring Cloud Config Server for distributed configuration property management
You have the ability to create a Git Repository (that is accessible to the Config Service) e.g. GitHub
READONLY UserIt is recommended that you create at least 2 repositories, one for secure encrypted properties and one for general non-secure properties. These repositories can then be configured with the appropriate team access according to your security posture. In our examples and reference, we’ve called the the Git repos, configserver-[ENV]-secure and configserver-[ENV]-insecure.
You will also want to create a READONLY user that has access to pull the properties from these corresponding repos. Take note of the credentials needed for this user as it will be set and injected into the configuration for Broadleaf’s Spring Cloud Config service.
You can pass in one or more backing Git datastore configurations for your properties using ENV properties. If you are using the helm charts that are generated for you using the helm:generate plugin, you will notice that you can configure these properties using the following helm properties (i.e. secrets.environmentRepositoryCreds.keyValuePairs.*) that are overridable in the values.yaml file.
Your overrides, might look something like this:
secrets:
  environmentRepositoryCreds:
    keyValuePairs:
      SPRING_CLOUD_CONFIG_SERVER_COMPOSITE_0_TYPE: "git"
      SPRING_CLOUD_CONFIG_SERVER_COMPOSITE_0_DEFAULT_LABEL: "develop"
      SPRING_CLOUD_CONFIG_SERVER_COMPOSITE_0_URI: "https://github.com/MyOrg/configserver-dev-insecure"
      SPRING_CLOUD_CONFIG_SERVER_COMPOSITE_0_USERNAME: "setme"
      SPRING_CLOUD_CONFIG_SERVER_COMPOSITE_0_PASSWORD: "setme"
      SPRING_CLOUD_CONFIG_SERVER_COMPOSITE_1_TYPE: "git"
      SPRING_CLOUD_CONFIG_SERVER_COMPOSITE_1_DEFAULT_LABEL: "develop"
      SPRING_CLOUD_CONFIG_SERVER_COMPOSITE_1_URI: "https://github.com/MyOrg/configserver-dev-secure"
      SPRING_CLOUD_CONFIG_SERVER_COMPOSITE_1_USERNAME: "setme"
      SPRING_CLOUD_CONFIG_SERVER_COMPOSITE_1_PASSWORD: "setme"
Many source code repositories allow notification of changes to a repository based on a configured webhook. You can setup webhooks following the directions identified by your code repository provider. For example, GitHub uses a POST to any configured webhooks with a JSON body containing a list of commits. Once the webhook is configured, Spring Cloud Config natively handles the processing and consumption of those events. More details on this can be found on Spring’s official documentation.
If you choose not to enable push notification integrations, you can always manually restart your config service, which during the start-up process will pull the latest properties and configurations from the configured Git repository
If all the config server Git repos have a webhook defined, once you check your properties into the configured branch, it will trigger a webhook and the config server on the relevant environment will pick up and load those changes automatically. Assuming there are no connectivity errors, there would be no need to restart or re-deploy the config server to pick up your property changes
This gets you closer to a fully "GitOps" style setup when dealing with application property configuration
Once the config server is informed of and loads these new properties, it will put a message on the Spring Event Bus which will inform all the applications that may be interested in that property to pick it up
Depending on the type of property it is, the flex package/spring application may automatically pick it up and use it. However, if it is a property that is loaded on startup - the flex package that needs to load/use that property will need to be restarted.
As an example, there is a property in the framework called broadleaf.order.metadata.enable-simple-returns which controls optional metadata loading. This would be considered an "application startup" property as it dynamically builds metadata during the startup of the application. So, if you were to "dynamically enable" this property on a running supporting flex package, it will have no immediate impact until the flex package pod is restarted
In contrast, if you wanted to dynamically change the logging levels of your running Flex Packages, you can set the applicable logging level properties and immediately see the changes propagate (e.g. logging.level.com.broadleafcommerce.common.messaging.notification=TRACE)
|
Tip
|
Additional details around the type of properties that will "immediately be refreshed" vs. ones that require that the application consuming those properties be re-started can be found on our Enhanced Environment Config Documentation |
Below you will find sample logging that gets emitted for a setup with webhooks defined showcasing dynamic refreshing of applicable properties on a Balanced Flex Package composition:
2025-09-24T15:33:30.846Z  INFO 1 --- [nio-8888-exec-1] o.s.c.c.monitor.PropertyPathEndpoint     : Refresh for: browse
2025-09-24T15:33:30.846Z  INFO 1 --- [nio-8888-exec-1] o.s.cloud.bus.event.RefreshListener      : Received remote refresh request.
2025-09-24T15:33:30.847Z  INFO 1 --- [nio-8888-exec-1] o.s.cloud.bus.event.RefreshListener      : Refresh not performed, the event was targeting browse:**
2025-09-24T15:33:30.847Z  INFO 1 --- [nio-8888-exec-1] o.s.c.c.monitor.PropertyPathEndpoint     : Refresh for: cart
2025-09-24T15:33:30.847Z  INFO 1 --- [nio-8888-exec-1] o.s.cloud.bus.event.RefreshListener      : Received remote refresh request.
2025-09-24T15:33:30.847Z  INFO 1 --- [nio-8888-exec-1] o.s.cloud.bus.event.RefreshListener      : Refresh not performed, the event was targeting cart:**
2025-09-24T15:33:30.847Z  INFO 1 --- [nio-8888-exec-1] o.s.c.c.monitor.PropertyPathEndpoint     : Refresh for: processing
2025-09-24T15:33:30.848Z  INFO 1 --- [nio-8888-exec-1] o.s.cloud.bus.event.RefreshListener      : Received remote refresh request.
2025-09-24T15:33:30.848Z  INFO 1 --- [nio-8888-exec-1] o.s.cloud.bus.event.RefreshListener      : Refresh not performed, the event was targeting processing:**
2025-09-24T15:33:30.848Z  INFO 1 --- [nio-8888-exec-1] o.s.c.c.monitor.PropertyPathEndpoint     : Refresh for: supporting
2025-09-24T15:33:30.848Z  INFO 1 --- [nio-8888-exec-1] o.s.cloud.bus.event.RefreshListener      : Received remote refresh request.
2025-09-24T15:33:30.848Z  INFO 1 --- [nio-8888-exec-1] o.s.cloud.bus.event.RefreshListener      : Refresh not performed, the event was targeting supporting:**
2025-09-24T15:33:32.121Z  INFO 1 --- [nio-8888-exec-8] o.s.c.c.s.e.NativeEnvironmentRepository  : Adding property source: Config resource 'file [/tmp/config-repo-15675337493231380564/browse.yml]' via location 'file:/tmp/config-repo-15675337493231380564/'
2025-09-24T15:33:32.617Z  INFO 1 --- [io-8888-exec-15] o.s.c.c.s.e.NativeEnvironmentRepository  : Adding property source: Config resource 'file [/tmp/config-repo-15675337493231380564/processing.yml]' via location 'file:/tmp/config-repo-15675337493231380564/'
2025-09-24T15:33:32.697Z  INFO 1 --- [nio-8888-exec-8] o.s.c.c.s.e.NativeEnvironmentRepository  : Adding property source: Config resource 'file [/tmp/config-repo-16490530680686592466/browse.yml]' via location 'file:/tmp/config-repo-16490530680686592466/'
2025-09-24T15:33:33.207Z  INFO 1 --- [nio-8888-exec-9] o.s.c.c.s.e.NativeEnvironmentRepository  : Adding property source: Config resource 'file [/tmp/config-repo-15675337493231380564/browse.yml]' via location 'file:/tmp/config-repo-15675337493231380564/'
2025-09-24T15:33:33.529Z  INFO 1 --- [nio-8888-exec-8] .c.s.e.MultipleJGitEnvironmentRepository : Fetched for remote main and found 1 updates
Audience: DevOps, SRE Teams
Stage: Environment Setup + Maintenance
Why: If you are using Broadleaf’s recommended Config Service, you may need to add and manage additional secure properties for your implementation (outside of the default Broadleaf properties)
Assumptions:
You’ve authenticated with Broadleaf’s Nexus to obtain the necessary tools and artifacts as identified in the Getting Started Locally guide
You are working with an Initializr-based Broadleaf project structure containing a manifest
You plan to use Broadleaf’s Spring Cloud Config Server for distributed configuration property management
You’ve already generated a set of security and config artifacts following the recipe "Generate New Security Artifacts" above, for each environment that you would like to update
credentials-report.envThe main mechanic for managing secure and encrypted properties within a Broadleaf ecosystem leveraging a Config Server is to manage these properties using the generated credentials-report.env which you will find in the generated security folder for your environment.
If you are adding/updating an existing credentials-report.env that is already applied to an environment, you will need to pull down the original "source" (presumably stored in your Secure Vault/Secrets Manager) in order to update it. You can then add arbitrary properties to this report using a special syntax which will be described below.
Suppose you have a new secure property that you wish to be encrypted and stored in the Config Server (e.g. MY_SECRET_PROPERTY=1234). In order to create the appropriate Spring Application Context property files with the encrypted values (to load into your config server), for example:
my:
  secret:
    property: '{cipher}{key:version_1}AQCQx...'
You can run the same security-tool.jar as mentioned in the recipe "Generate New Security Artifacts" against the updated credentials-report.env with the new property added.
The key difference is that (since Broadleaf does not have any knowledge of what this property is) you must define this property in your credentials-report.env file with a special syntax that matches the following form:
[PROPERTY_KEY]_EXTENSION_[PROFILE]_[PROFILE]...
[PROPERTY_KEY] is the fully qualified property using Spring’s Relaxed Binding underscore notation
followed by the constant _EXTENSION_
followed by one ore more [PROFILE] 's which define which microservice this specific property is applicable to
For example, let’s say the MY_SECRET_PROPERTY that I am trying to add is only applicable to the Auth microservice, in that case, I could add the following new plain-text property in my credentials-report.env
MY_SECRET_PROPERTY_EXTENSION_AUTH=1234
After modifying the security/credentials-report.env with the new secret using the special syntax,
run in your current working environments working directory:
java -jar security-tool.jar encrypt
After running the encrypt command, you should now have newly encrypted config properties in your config/secure directory for that environment. If you have this pointed to a backing Git repo, you can now check in these changes directly to source control.
To determine the "Profile Keys" that you can use in your property syntax, you can download the component-profiles-map.yml which will give you a file that contains the different profiles the security tool uses when creating the appropriate encrypted configuration files.
Similar to downloading the security-tool.jar you will want to obtain the correct version of the component-profiles-map.yml that applies to your installation. In the manifest directory of your main Broadleaf project, run the following Maven command:
./mvnw -q \
  org.apache.maven.plugins:maven-help-plugin:3.2.0:evaluate \
  -Dexpression=blc.starter.version \
  -DforceStdout
Take note of the emitted version as you will use this in the next step.
Run the following Maven command in the manifest directory of your main Broadleaf project. Take note to replace the [replace_with_correct_version] and [/my/local/path/to/my-dev.com] placeholders in the below command.
./mvnw org.apache.maven.plugins:maven-dependency-plugin:3.6.0:unpack \
  -Dartifact=com.broadleafcommerce.microservices:broadleaf-microservices-starter-bootstrap:[replace_with_correct_version]:jar \
  -DartifactId=broadleaf-microservices-starter-bootstrap \
  -DgroupId=com.broadleafcommerce.microservices \
  -Dincludes=component-profiles-map.yml \
  -DoutputDirectory=[/my/local/path/to/my-dev.com] \
  -DstripVersion=true
This should download the component-profiles-map.yml file to your environment’s working directory. If you inspect the contents of this file, you can find the different profile keys that can be used to target specific microservice components.
With the special syntax EXTENSION[PROFILE]_[PROFILE]…, you can think of the Profile as a "tag" that a specific microservice will "respond to"
In your manifest.yml, you will have a bunch of flex packages defined:
- name: processing
  flexUnits: import,indexer,scheduledjob,search,inventory,catalog,offer,pricing,customer,order,menu,content,bulkops,etc...
- name: browse
  flexUnits: asset,catalog,catalogbrowse,content,menu,offer,pricing,ratings,vendor,etc...
etc...
for each flex package the SecurityTool will iterate through each of the flexUnits, and ask "what property profiles should I look at based on the flex units in my flex package?"
the tool checks the default component-profiles-map.yml (described above) and will look at all the "profiles" associated with that microservice to determine if it should add that to the list of properties to be considered (or it will look at any custom profiles specified in your manifest for new components)
as an example, let’s say you have the property: MY_EXAMPLE_PROPERTY_EXTENSION_BROWSEFLEX. It may seem misleading at first and expect that you would only see the encrypted property be generated in the config/secure/browse.yml file. However, the component-profiles-map.yml defines the profile "tag" BROWSEFLEX for several flex units. In particular, the catalog microservices responds to the BROWSEFLEX tag, and the catalog microservice is also part of the Processing flex package in a typical Balanced Flex Package composition. With that, you should expect to see your my.example.property in both the config/secure/browse.yml file as well as the config/secure/processing.yml
When utilizing this special property syntax, it is recommended that when you know that a particular property is needed for a specific microservice - you should target that service specifically (instead of using the BROWSEFLEX, SUPPORTINGFLEX etc… tags).
As an example, if you wish that the property my.other.example.property be encrypted for only the Notification Microservice, you should create the property specifically targeting the notification profile tag i.e. MY_OTHER_EXAMPLE_PROPERTY_EXTENSION_NOTIFICATION=12345
Audience: DevOps, SRE Teams
Stage: Environment Setup
Why: It is common to configure Broadleaf Microservices to point to a externally managed datasource (e.g. a Cloud Managed SQL instance). The following recipe will guide you through the configuration needed to support this.
Assumptions:
You’ve authenticated with Broadleaf’s Nexus to obtain the necessary tools and artifacts as identified in the Getting Started Locally guide
You are working with an Initializr-based Broadleaf project structure containing a manifest
You plan to use Broadleaf’s Spring Cloud Config Server for distributed configuration property management
You’ve already generated a set of security and config artifacts following the recipe "Generate New Security Artifacts" above, for each environment that you would like to update
This will build on top of the recipe "Encrypt New Secure Properties for Config Server", so please review and be familiar with that recipe before proceeding
For this recipe, we will configure and store encrypted connection info and credential information in Broadleaf’s Config Service.
To do this, we will override and re-encrypt properties on an existing credentials-report.env and then sync that to our backing Config Service datastore (e.g. Git). Following the patterns described in the recipe "Encrypt New Secure Properties for Config Server", we can change and add the following properties to our security/credentials-report.env file for my current environment’s working directory:
# Database Data
BROADLEAF_DATASOURCE_PASSWORD=<set me>

# Cloud Database Connection Info
BROADLEAF_COMPOSITE_DATASOURCE_URL_EXTENSION_PROCESSINGFLEX_SUPPORTINGFLEX_BROWSEFLEX_CARTFLEX_DATA=jdbc:postgresql://<my-ip>:5432/broadleaf
SPRING_DATASOURCE_URL_EXTENSION_AUTH_DATA=jdbc:postgresql://<my-ip>:5432/broadleaf?currentSchema=auth
To summarize:
update the property BROADLEAF_DATASOURCE_PASSWORD to our new Cloud SQL DB instance password.
using the "Special Config Syntax", we can update the Datasource URL and target this property to the following microservice flex packages and applications: Processing, Supporting, Browse, Cart, Data, and Auth
After modifying the credentials-report.env with the data store information, you can now run the following Java command in your environment’s working directory:
java -jar security-tool.jar encrypt
With this run, you should now have newly encrypted config properties in your config/secure directory which you can now sync with your Config Service
Audience: DevOps, SRE Teams
Stage: Initial Environment Setup
Why: When you’re setting up a new environment and you need to make a change to the manifest.yml that informs the creation of new security artifacts, then you will need to run the generate security-tool command against the new manifest JAR in order to produce new security artifacts.
Example Use Case: You plan to deploy certain services like Kafka to another namespace in Kuberentes (instead of default) . If you do this, you’ll need to change/update the "alternate domains" in your manifest.yml file which will inform the creation process of all self-signed certificates. Specifically, we may need to inform the generation process of the SAN’s fully qualified domains that need to be added to the trust stores when generating those security artifacts (i.e. all applicable Kubernetes DNS paths that may contain my new namespace).
Assumptions:
You’ve authenticated with Broadleaf’s Nexus to obtain the necessary tools and artifacts as identified in the Getting Started Locally guide
You are working with an Initializr-based Broadleaf project structure containing a manifest
You plan to use Broadleaf’s Spring Cloud Config Server for distributed configuration property management
You’ve already generated a set of security and config artifacts following the recipe "Generate New Security Artifacts" above, for each environment that you would like to update
Let’s say you wish to deploy Kafka to a new Kubernetes namespace called broadleafsupporting instead of deploying it to the default namespace. With this example, you will need to update the alternates domains in your manifest.yml to include/change the alternate domains to specify that specific k8 namespace:
- name: broker
  platform: kafka
  descriptor: snippets/docker-kafka.yml
  enabled: true
  domain:
    alternates:
    - kafkacluster-0.kafkacluster-headless.broadleafsupporting.svc.cluster.local
    - kafkacluster-0.kafkacluster-headless.broadleafsupporting.svc.cluster
    - kafkacluster-0.kafkacluster-headless.broadleafsupporting.svc
    - kafkacluster-0.kafkacluster-headless.broadleafsupporting
    - kafkacluster-0.kafkacluster-headless
    - kafkacluster-1.kafkacluster-headless.broadleafsupporting.svc.cluster.local
    - kafkacluster-1.kafkacluster-headless.broadleafsupporting.svc.cluster
    - kafkacluster-1.kafkacluster-headless.broadleafsupporting.svc
    - kafkacluster-1.kafkacluster-headless.broadleafsupporting
    - kafkacluster-1.kafkacluster-headless
    - kafkacluster-2.kafkacluster-headless.broadleafsupporting.svc.cluster.local
    - kafkacluster-2.kafkacluster-headless.broadleafsupporting.svc.cluster
    - kafkacluster-2.kafkacluster-headless.broadleafsupporting.svc
    - kafkacluster-2.kafkacluster-headless.broadleafsupporting
    - kafkacluster-2.kafkacluster-headless
Once you’ve saved your new manifest.yml. Generate a new manifest.jar and place the security-tool.jar and the project’s updated manifest.jar in the same environment working directory.
Run: java -jar security-tool.jar generate
Output: will produce updated security artifacts (e.g. kafka trustore and creds) in the security directory of the same working directory
if there are existing certificates and truststore artifacts already present in the security directory, and you want to replace them, you will need to delete the old ones first and then run generateto generate new artifacts
Audience: Architects, DevOps, SRE Teams
Stage: Initial Environment Setup
Why: Broadleaf supports the use of "configurable seed data" through the use of Liquibase Params. Liquibase Params support the idea of a "one-time" initial load property mechanism that can be overriden via ENV properties e.g. SPRING_LIQUIBASE_PARAMETERS_*
How: Broadleaf leverages the Liquibase Params concept to support overriding seed data properties that are typically changed or updated across implementations. For example, I may want to explicitly define the bcrypt password for the master admin (instead of using the generated password).
Passing in Liquibase Parameters replaces placeholder values that are defined in the framework’s liquibase changelog files:
<property name="blcAdminPasswordBcrypt" value="todo-set" />
<changeSet author="broadleaf" id="auth-user-7" labels="auth,required">
        <preConditions onFail="MARK_RAN">
            <sqlCheck expectedResult="0">SELECT COUNT(*) FROM blc_user WHERE id='-2';</sqlCheck>
        </preConditions>
        <insert tableName="blc_user">
            <column name="id" value="-2" />
            ...
            <column name="PASSWORD" value="${blcAdminPasswordBcrypt}" />
            ...
        </insert>
</changeSet>
With this convention in place, you may notice a couple pre-generated ENV properties for you in your security/credentials-report.env, for example:
SPRING_LIQUIBASE_PARAMETERS_BLCADMINPASSWORDBCRYPT=$2a$10...
SPRING_LIQUIBASE_PARAMETERS_BLCADMIN2PASSWORDBCRYPT_EXTENSION_LIQUIBASE=$2a$10...
SPRING_LIQUIBASE_PARAMETERS_BLCADMINAAAPASSWORDBCRYPT_EXTENSION_LIQUIBASE=$2a$10...
These properties can be manually changed prior to an initial installation , re-encrypted using the security-tool.jar as mentioned in the recipe: "Encrypt New Secure Properties for Config Server" and synced with the config server.
During an initial installation, the data module will pull these values from the config server and run the appropriate changelogs applying any Liquibase Params overrides as necessary to your empty datastore.
Liquibase changelogs are applied once and marked as "run" in a databasechangelog table. This is typically done during initial installation when running the data module (or via the job-data helm chart in kubernetes) for the first time. The initializr required changelogs contain pre-conditions "Mark Ran as Failed" if an existing record already exists in the datastore.
What does this mean? From an operational perspective, if (as an example) you wish to change the master admin password and bcrypt value and you’ve already applied the changelog with a previously set password, then changing credentials in the credentials report and re-generating encrypted values for the config server will have NO IMPACT on the data since that record has already been inserted and applied.
Options to change a "seed data" record if already applied:
manually update the data in your datastore (ignoring what’s specified in the credentials report)
If you would like to have the credentials report and associated config server encrypted "in sync" with the values in the data store, then you will need to manually remove the database changelog and associated applied record and then re-run the data module with the new seed property applied from the configserver.
Audience: Architects, DevOps, SRE Teams
Stage: Initial Environment Setup
Why: In some instances, you may find it useful to override properties defined in your manifest.yml file with ENV properties, so that they can be changed for different environments.
For example, let’s say you wanted to use a different relational datasource for local development (e.g. postgres) vs. when deployed to a higher environment (e.g. oracle). In your manifest.yml, you may have the following configuration set:
- name: database
  platform: postgresql
  descriptor: snippets/docker-postgres.yml
  enabled: true
  domain:
    cloud: database
    docker: database
    local: localhost
  resourceName: broadleaf
  ports:
    port: '5432'
- name: database
  platform: oracle
  descriptor: snippets/docker-oracle.yml
  enabled: false
  domain:
    cloud: database
    docker: host.docker.internal
    local: localhost
  resourceName: xe
  ports:
    port: '1521'
    tnslsnrPort: '5500'
You can override any property in the manifest.yml at runtime by specifying ENV properties.
For example, if for a specific environment, I would like to "disable" the postgres supporting component and enable/modify the oracle supporting component - you can specify the following:
BROADLEAF_MANIFEST_SUPPORTING_ENABLED=oracle
BROADLEAF_MANIFEST_SUPPORTING_DISABLED=postgresql
BROADLEAF_MANIFEST_SUPPORTING_DATABASE_DOMAIN_CLOUD=[IP address or domain name of standalone Oracle]
BROADLEAF_MANIFEST_SUPPORTING_DATABASE_PORT=1234
BROADLEAF_MANIFEST_SUPPORTING_DATABASE_RESOURCENAME=ORCLCDB
in the default HELM charts, the best way to define the above is via the extraEnvproperty block. Also be aware that somevalues-local.ymlfiles may have defined someextraEnvsalready.
Audience: Developers, Architects, DevOps, SRE Teams
Stage: Application Debugging
Why: It’s often times useful to understand what actual properties the Broadleaf Flex Applications are resolving and using during startup and runtime. Broadleaf provides a configurable startup report that will emit all resolved properties to help troubleshoot any property-related questions.
By default, for security purposes, the Broadleaf Environment Report is disabled, however configuring the following property for an application can turn it on for debugging purposes.
We recommend that this be DISABLED for production environments
broadleaf:
  environment:
    report:
      disabled: 'false'
Audience: Developers, Architects, DevOps, SRE Teams
Stage: Application Debugging
Why: When troubleshooting configuration-related issues in your Kubernetes (K8s) environment, you can perform the following sanity check to verify which values and credentials are being served from the Spring Configuration Server.
This guide walks through how to locally access and inspect the Config Server using a port-forwarded connection, leveraging Kubernetes tooling.
Access to the Kubernetes cluster where the Config Server is deployed
A Kubernetes management tool (e.g., kubectl, K9s, Lens, Octant, or the Kubernetes Dashboard)
Permission to port-forward services and view environment variables
A web browser
Locate and Port-Forward the Config Server Service
In your Kubernetes tool, locate the Config Server Service.
Open a port forward to the Config Server service, which typically runs on port 8888.
You can use any available local port (e.g., localhost:9000 → 8888).
You can read more about port-forwarding on the official K8 documentation here
Retrieve the Config Server Credentials
From the Config Server deployment or pod, locate the environment variable: SPRING_SECURITY_USER_PASSWORD
Copy the value of this environment variable - you will use it to log in to the Config Server in a later step
Access the Config Server Locally
Open your browser and navigate to https://localhost:(your-local-port)/config/data/default (Replace (your-local-port) with the port you specified in the port-forward command.
When prompted for credentials, enter:
Username: configClient
Password: The value you copied from the SPRING_SECURITY_USER_PASSWORD environment variable
Verify the Served Configuration
Once logged in, you will see the configuration data being served from the Config Server. These are the same property values that all connected Spring Boot applications retrieve at runtime.
Optional Sanity Check
To ensure consistency between the configuration server and the database:
Locate the property: blcAdminPasswordBcrypt
Cross-reference its value with the blc_admin_password_bcrypt field (or equivalent) stored in the auth.blc_user table within your database.
Matching values confirm that the Config Server is correctly supplying the expected configuration.
|
Important
|
This step is required when deploying Broadleaf Release Trains 2.2.1+ |
This step discusses how to configure your cloud ingress and the Broadleaf admin/storefront gateway applications to securely and correctly process X-Forwarded-For and Forwarded headers.
In typical cloud deployments, the Broadleaf gateways are not directly at the 'boundary of trust'. Instead, a cloud ingress configuration (ex: Ingress-Nginx, Azure Application Gateway, Google Cloud Application Load Balancer) sits in front of the Broadleaf gateways as the first entrypoint for untrusted external requests. The ingress does its own processing/setting of X-Forwarded-For/Forwarded headers before forwarding the request to the Broadleaf gateways, which do the same thing before passing it further down to the backend services.
The expectation is generally like so:
The cloud ingress eliminates any X-Forwarded-For or Forwarded headers that are provided in the original untrusted external request
The cloud ingress calculates and sets its own values for the X-Forwarded-For/Forwarded headers before passing the request to the Broadleaf gateway
The Broadleaf gateway trusts the X-Forwarded-For/Forwarded headers that come from the ingress and honors them when calculating what to forward to downstream services
In this scenario, the Broadleaf gateways are not directly exposed to the internet, and thus are only expecting requests to come from the trusted ingress. The burden of pruning untrusted headers is on the cloud ingress, and therefore the Broadleaf gateways do not need to be concerned with where the headers came from before deciding whether to honor them.
On the other hand, if the Broadleaf gateways are directly exposed to external untrusted traffic instead of being behind an ingress, then the burden of pruning untrusted headers does fall upon them.
If you are using a cloud ingress as the boundary of trust in your deployment, we recommend verifying that it is configured to prune untrusted forwarded headers from requests before passing them to the Broadleaf gateway.
When using Ingress NGINX Controller
Ensure the use-forwarded-headers configuration property (see Ingress NGINX property documentation) is set to false, which will ensure NGINX will ignore all incoming X-Forwarded-* headers. This is already the default setting.
When using Google Cloud’s GKE Ingress Controller
As explained in GKE ingress configuration documentation, you can introduce a custom BackendConfig resource that defines a customRequestHeaders specification.
In this section, you can replace the incoming X-Forwarded-For header with only the client IP address (and ingress controller IP address if necessary):
customRequestHeaders:
  headers:
  - "X-Forwarded-For:{client_ip_address},{server_ip_address}"
This is based upon the guidance in Google Cloud’s Load Balancing documentation.
When using Google Cloud Application Load Balancer
As explained in Google Cloud Load Balancing documentation, you can leverage the custom header rewrite functionality to replace the incoming X-Forwarded-For header with only the client IP address (and load balancer IP address if necessary): --custom-request-header=x-forwarded-for:{client_ip_address},{server_ip_address}. This ensures the incoming existing X-Forwarded-For values are discarded.
When using Azure Application Gateway
As explained in Azure Application Gateway documentation, you can leverage the custom header rewrite functionality to change how the X-Forwarded-For header is processed.
One approach is to do what is recommended in this documentation, where you define a 'Set' action to make the header value of X-Forwarded-For equal to {var_client_ip}, using the client_ip server variable. This ensures the incoming existing X-Forwarded-For values are discarded.
This applies to both the admin and commerce gateways.
|
Note
|
Some of the custom properties and configuration referenced below are only available when using Broadleaf’s out-of-box admin and commerce gateway modules or Docker images. If you are not directly using Broadleaf’s gateway projects and are instead building your own custom gateway modules, we highly recommend that you incorporate the same code customizations in your gateways projects and then follow the rest of the guide below to engage those components. In the future, it’s possible these code customizations become irrelevant as new versions of Spring Cloud Gateway eliminate the need for them. Until then, please include them in your project. How to Copy Broadleaf Gateway Code Customizations for Forwarded Headers in Custom Gateways Projects:
|
In local development environments only, IP whitelisting does not matter, and thus you can just set the following property values to allow forwarded headers from any source:
spring:
  cloud:
    gateway:
      # Set this to a Java regex string matching IP addresses from which the gateway should trust
      # forwarded headers.
      #
      # For localdev, allow forwarded headers from anywhere.
trusted-proxies: '.*'|
Note
|
If using a Broadleaf manifest-based project, this is typically already generated for you in config/insecure/gateway-local.yml.
|
In non-local (ex: production) environments, set the following property values:
spring:
  cloud:
    gateway:
      x-forwarded:
        # Disable Spring's out of box XForwardedHeadersFilter
        enabled: false
      forwarded:
        # Disable Spring's out of box ForwardedHeadersFilter
        enabled: false
      # Set this to a Java regex string matching IP addresses from which the gateway should trust
      # forwarded headers.
      trusted-proxies: 'SETME'
broadleaf:
  gateway:
    custom-x-forwarded-headers-filter:
      # Enable Broadleaf's custom XForwardedHeadersFilter
      enabled: true
    custom-forwarded-headers-filter:
      # Enable Broadleaf's custom ForwardedHeadersFilter
enabled: true|
Note
|
If using a Broadleaf manifest-based project, you can place this in config/insecure/gateway-cloud.yml.
|
In the above snippet, the SETME placeholder for spring.cloud.gateway.trusted-proxies should be replaced with the appropriate regex for your environment. Here too, the value to use depends on your specific deployment configuration.
When using a cloud ingress and the gateway is not directly exposed to untrusted traffic
As noted earlier, in this case, the whitelisting done at the gateway level is not as important, since the burden is on the cloud ingress to discard untrusted information.
If you are using Ingress NGINX deployed as an ingress controller in your K8s cluster, the Broadleaf gateway will receive requests from the IP address of the Kubernetes pod the controller is deployed on. Pod IPs are private IP addresses, and fall within the Pod CIDR range configured at cluster creation time. If the controller’s containing pod is redeployed, the pod IP will change to a different value within that CIDR range. Thus, you have a few options:
(most restrictive) Set the regex to match the private pod IP CIDR range from your K8s cluster configuration, thereby only allowing headers to come from those internal pod IPs (of which the ingress-nginx controller IP will be a member)
(medium restrictive) Set the regex to match any class A, B or C private IP address. This serves as a basic sanity filter ensuring no external public IP address is allowed to provide this information.
(unrestricted, use with caution) Set the regex to allow forwarded headers on all requests (ex: .*). This can be safe if you are absolutely certain no external traffic with unchecked forwarded headers can reach the gateway directly.
If you are using Google Cloud Application Load Balancer, Google provides documentation outlining the 'source IP address' that backend systems (such as the Broadleaf gateway) will see.
Your regex should match IP addresses in this range.
If you are using Azure Application Gateway, the backend system (such as the Broadleaf gateway) will see the IP of the Azure Application Gateway. Over the lifetime of the application gateway, the IP address should remain static. Thus, simply obtain the IP address of the application gateway, and create a regex that will match its value.
When not using a cloud ingress and the gateway is directly exposed to untrusted traffic
In this case, the gateway-level whitelisting is important.
If you are not expecting any trusted proxy to be forwarding requests to the gateway, you will want to disallow forwarded headers from all sources. To achieve this, use a regex that matches nothing - for example, $^ (logical contradiction).
Otherwise, if there are some trusted proxies from which you expect requests, use a regex to match their IP addresses.