
- v1.0.0-latest-prod
This tutorial will show you how to make a very simple add-to-cart API request to your provisioned demo instance of Broadleaf Microservices.
|
Tip
|
If you haven’t already, we recommend reading our introductory OpenAPI UI article before going through this. |
|
Tip
|
While we believe the OpenAPI UI is the best way to experience the Broadleaf Microservices API, if you want to follow this tutorial using the popular Postman utility, please see our Postman Reference article before proceeding. |
Using the OpenAPI UI, learn how to make a request to the Cart Operations microservice to add a product to a cart.
Before we add a cart we will need to generate a cart. Navigate to the cart operation in the interactive OpenAPI UI.
Visit the OpenAPI UI (https://[your-demo-identifier].admin.blcdemo.com/api/docs).
Find "Cart Operations Service" in the left navigation menu.
Scroll down to the "Cart" tag.
Find the POST /cart operation.
This is the operation we will be using to generate our cart.
Since this operation is publicly available and not secured, we don’t have to do anything for authentication/authorization. Full steam ahead!
Click the "Try it out" button near the top of the operation to enable generating the cart
Specify request parameters.
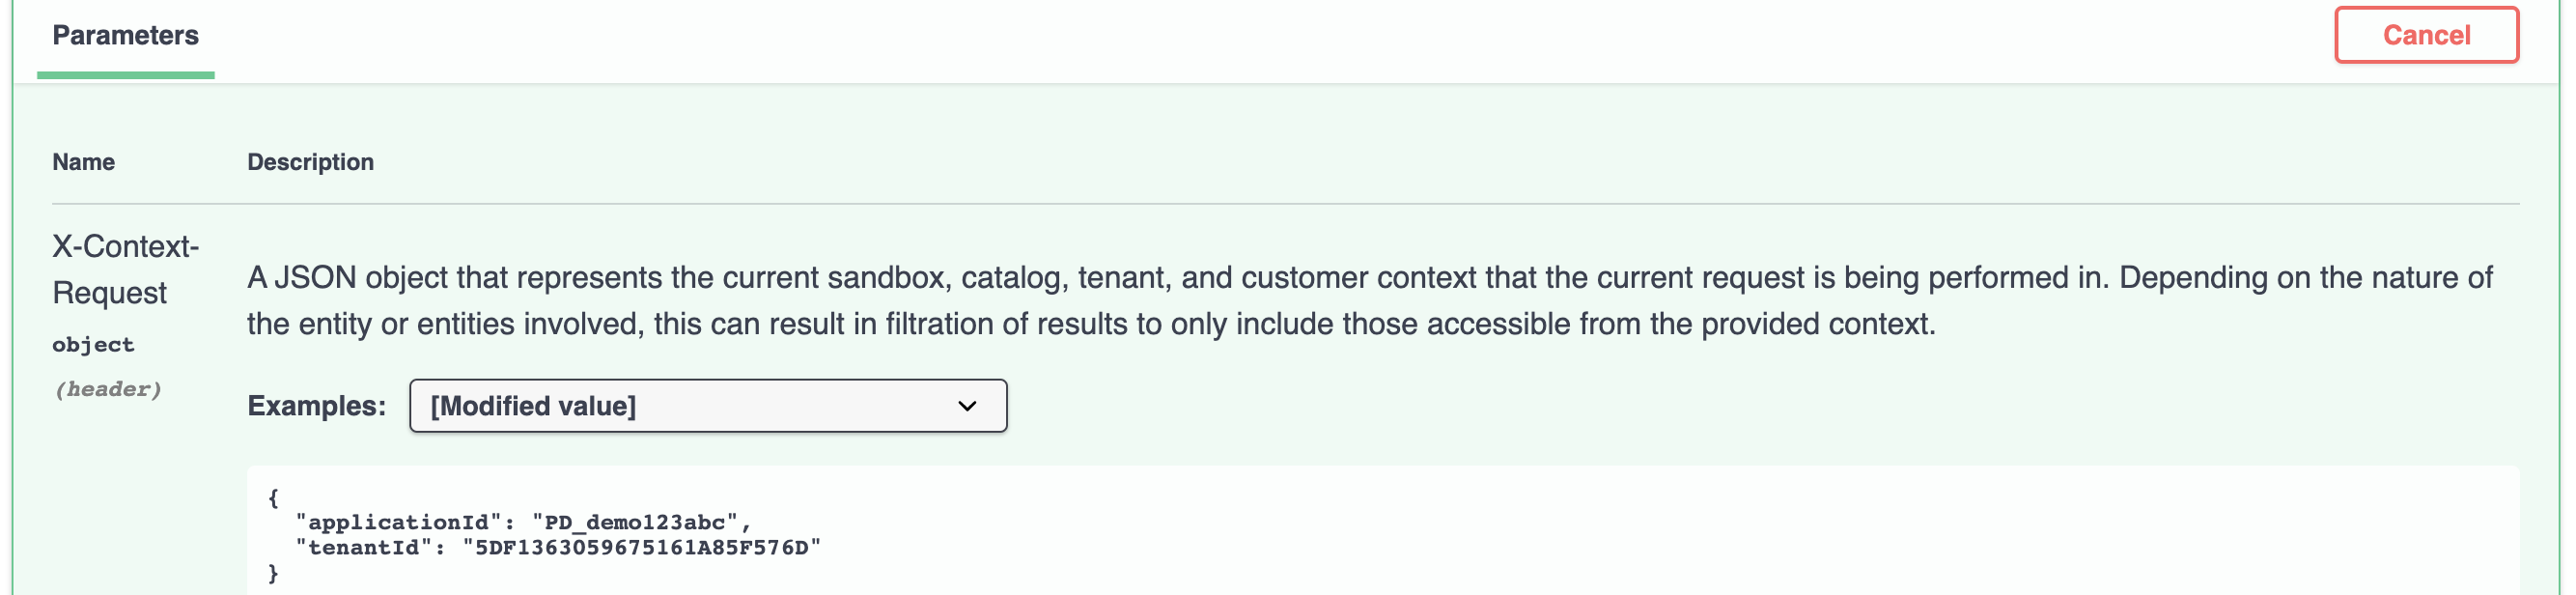
X-Context-Request
X-Context-Request is a header containing crucial context information the server will use to "narrow" results.
By default, the value for this is loaded from the "Application Context" example.
We can’t just directly use this value, though, as we need to make sure it matches the context of your specific provisioned demo instance.
Change the applicationId property in the value to PD_[your-demo-identifier], where [your-demo-identifier] the unique identifier of your demo (ex: demo123abc).
This is the applicationId of the application that was created when you provisioned your demo.
You can leave tenantId as-is, since your application will have been provisioned within that default tenant.
Request Body We only need the type of cart for this request, so we can remove every other field and keep "type" as "STANDARD"
Click the "Execute" button to submit the request. The "id" field is the id we will be using for our Add to Cart request.
Make a request to add the "Green Ghost" product to a cart.
Find the POST /cart/{cartId}/items operation. This is the operation we will be making requests to.

As documented in the operation’s request body schema, we will need to supply the ID of the product which we want to add to the cart. This means we need to get the "Green Ghost" product’s ID. To make this easy, we’ll visit the admin application and get them from there.
Sign into the Broadleaf Admin (https://[your-demo-identifier].admin.blcdemo.com) using the admin user credentials given to you upon signup.
In the navigation menu, select "Products" under "Catalog". This should reveal a grid of products.
|
Note
|
Wondering where the product data came from? Your demo instance will have some simple seed data already populated at the time it is provisioned. These products come from that seed data. |
Click on the "Green Ghost" product.
From your browser’s address bar, grab the value after /products/, which is the ID of the product.
In this case, it should be product1.
Build and send the request.
Return to the add-to-cart operation in the OpenAPI UI, and click the "Try it out" button near the top of the operation to enable drafting the request.
Specify request parameters.
The operation exposes quite a few parameters, but they’re largely optional. To keep things simple, we’ll just be customizing two parameters and leaving the rest as-is:
X-Context-Request Just as with the /cart operation, we will need to change the applicationId field to PD_[your-demo-identifier] and leave tenantId as is
cartId This will be the Id of the Cart. Take it from the POST /cart operation we did previously
The UI should now look something like this:
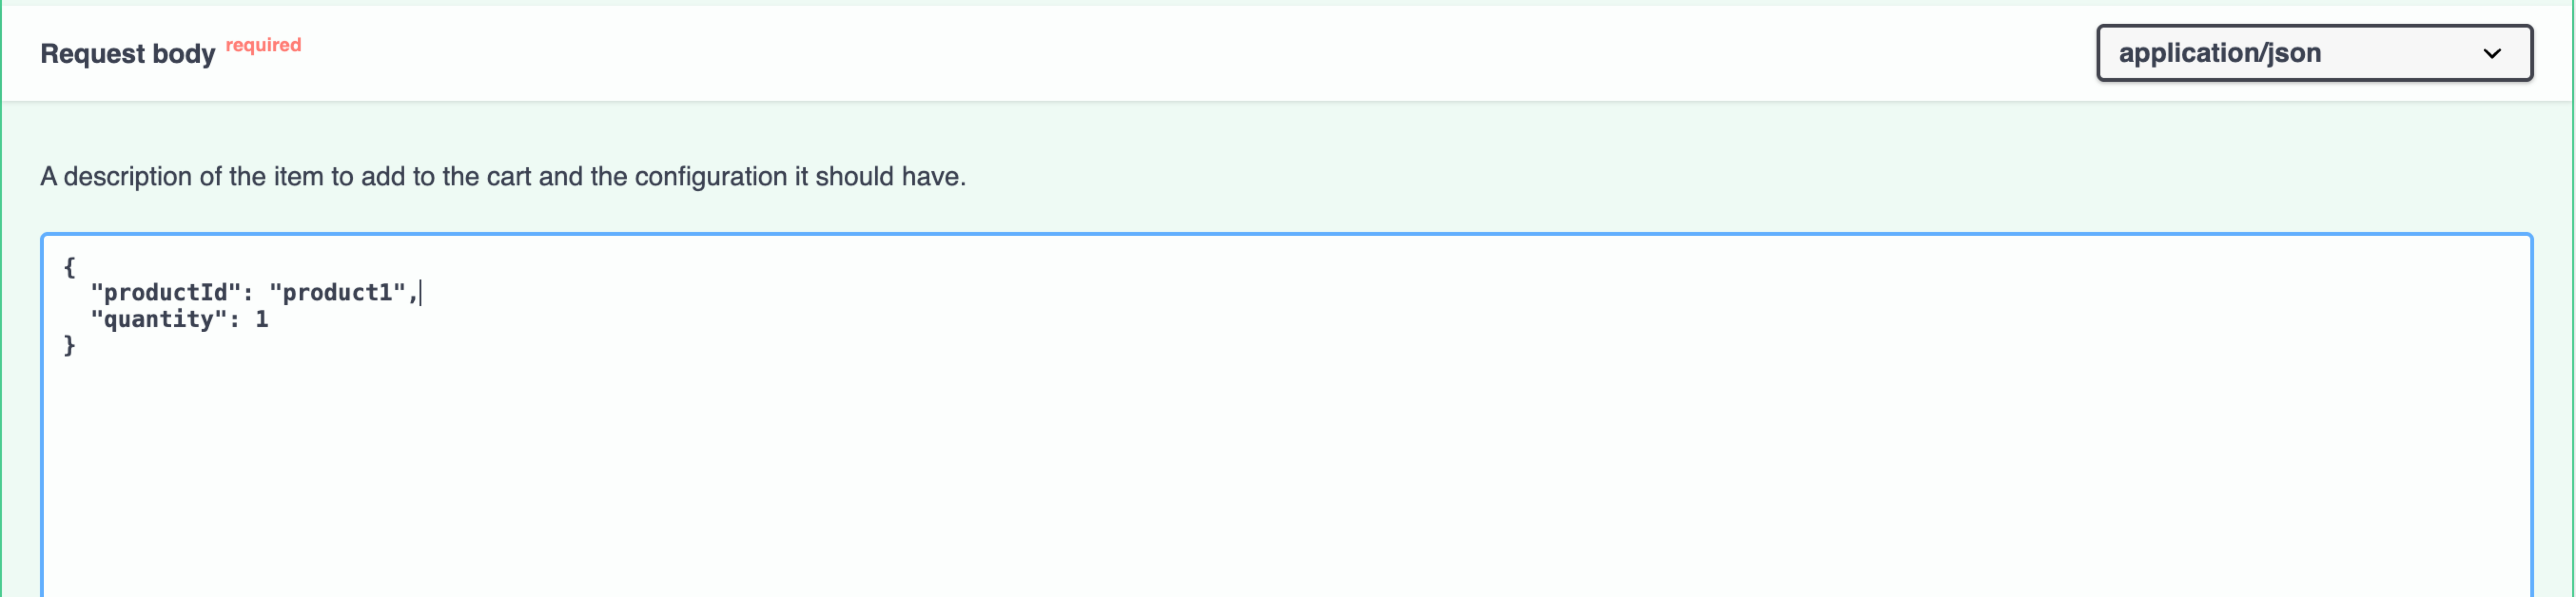
Specify the request body.
Take another look at the request body schema, named Request body.
|
Tip
|
You may need to exit "Try it out" mode to reveal the "Schema" button again. To do this, simply scroll up to the place where the "Try it out" button was, and click the "Cancel" button. |
A lot of these fields are optional or situational, and in the interest of simplicity, we will only supply those that are needed.
productId is needed to identify the product.
Supply the values obtained earlier from the "Green Ghost" product.
quantity will just be 1
Click the "Execute" button to submit the request.
Examine the response.
If you scroll down a little, the "Server Response" will be shown.
It should be a 200 with your cart and its items.
If you click on "Schema" next to "Example Value", you’ll be treated to a view that clearly shows each of the fields to expect, along with their description, type, and defaults.

You’re probably wondering what the data in the payload actually means.
To find out, you’ll need to see the response schema next to the 200 entry in the "Responses" section, as shown in the OpenAPI UI article.
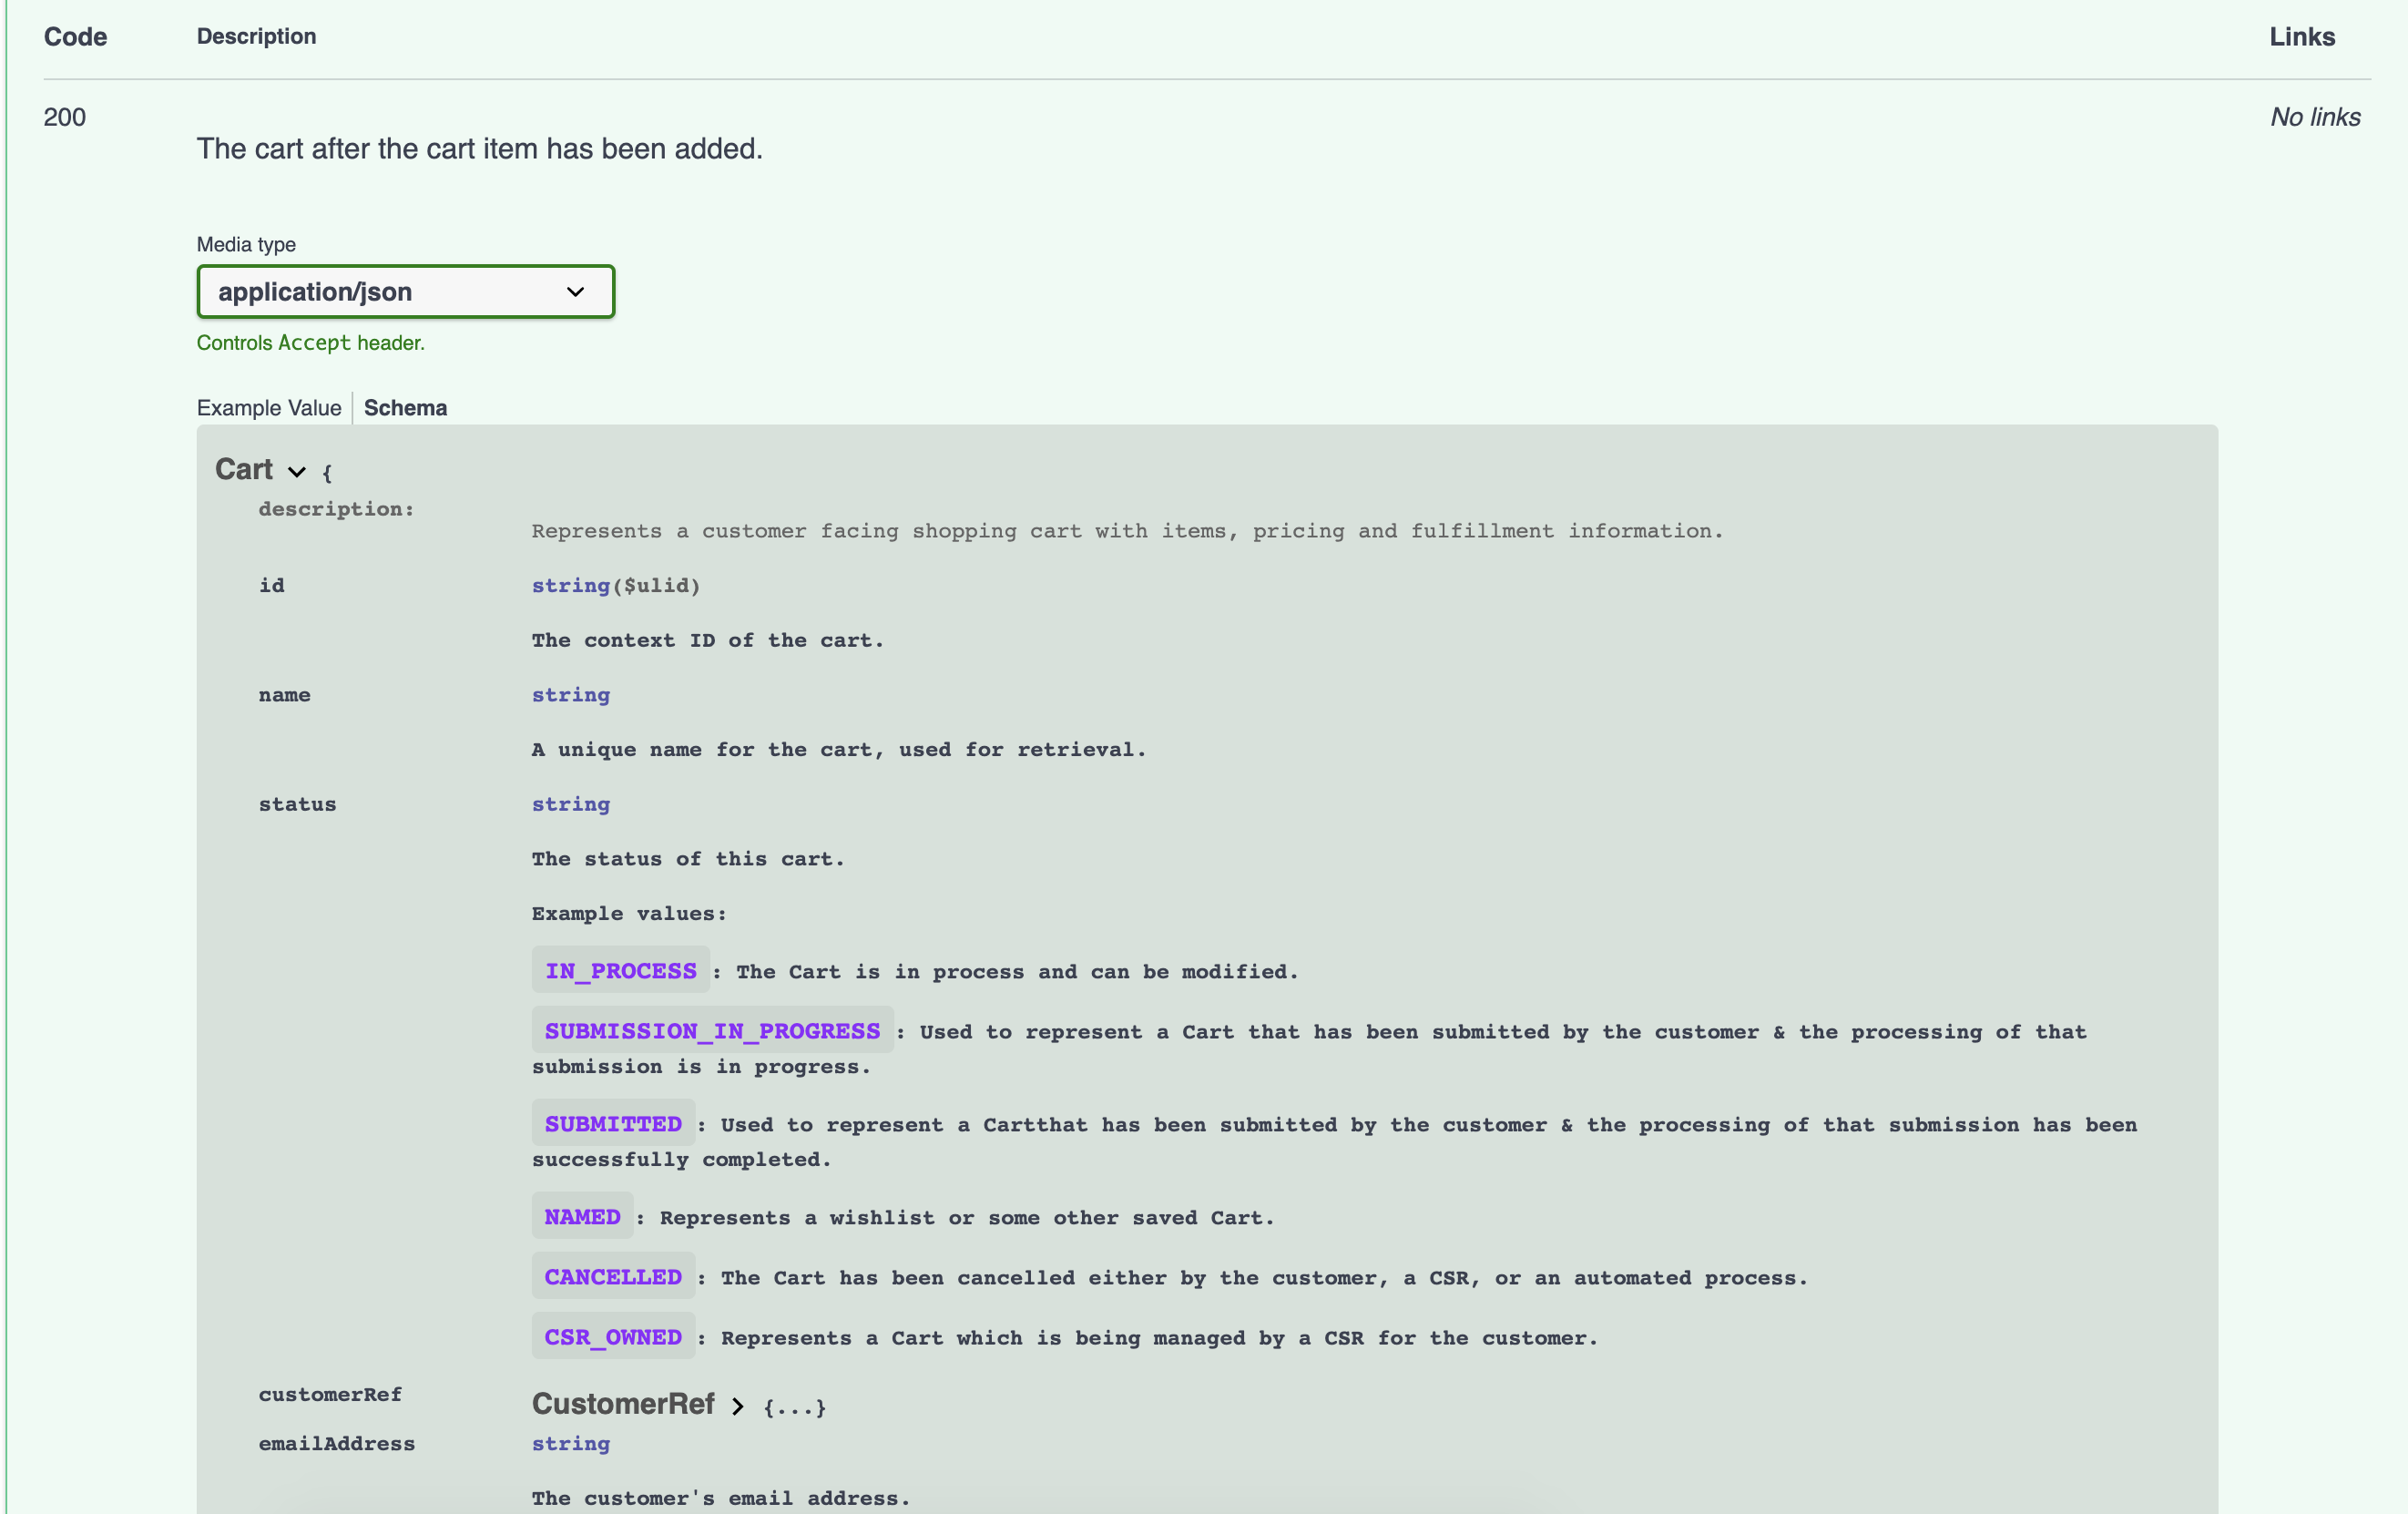
Voila! This gives you helpful conceptual information about the various fields you’d expect in the response and what they mean.
This marks the end of this tutorial. Nice work!