export BLC_REGISTRY_USER=<my_broadleaf_nexus_user>
export BLC_REGISTRY_PASSWORD=<my_broadleaf_nexus_password>
export BLC_REGISTRY_EMAIL=<my_broadleaf_nexus_email>
- v1.0.0-latest-prod
The following tutorial will walk through the steps necessary to deploy an Initializr generated starter project to an empty Kubernetes cluster.
|
Important
|
The following requires ENTERPRISE credentials and access to various Broadleaf resources outlined in this guide: Getting Started Locally. Please read this section and have the appropriate local environment setup configured before proceeding. Certain plugins and dependencies referenced here are not available with an EVALUATION Version. Please reach out to us if you have any additional questions. |
To begin with, you’ll need a broadleaf generated project structure as a basis for the deployment process. The tutorials below assume some default dependencies are chosen (which will work in conjunction with the generated helm charts referenced in this guide).
Generate an Initializr Project from: https://start.broadleafcommerce.com
Choose the latest stable release channel
Choose Balanced as a deployment flex package (Note: this is our recommended deployment for most Enterprises)
Leave the default dependencies in place (Postgresql, Cloud Stream Kafka, Cloud Config)
Click the Checkbox for Would you like to enable Demo Data?
Click Generate which should download a manifest.zip file to your local machine.
Unzip the manifest.zip into a folder on your local machine and cd into the manifest directory
Make sure you’ve set up the appropriate Broadleaf credentials as defined in the getting started guide here
In the manifest folder, run ./mvnw clean install flex:generate
In the manifest folder, run ./mvnw helm:generate -DdemoImages=true
After running this command, you should see a generated Broadleaf Microservices project
structure in the same directory as the manifest folder.
The following scripts used in this tutorial rely on pulling resources and artifacts from Broadleaf’s Nexus. It’s recommended that you export the following ENV properties with your specific Broadleaf Credentials that you were given. Otherwise, you will need to pass these in with every execution of the referenced scripts below.
Configure credentials to Broadleaf Nexus in your .bashrc or .zshrc:
export BLC_REGISTRY_USER=<my_broadleaf_nexus_user> export BLC_REGISTRY_PASSWORD=<my_broadleaf_nexus_password> export BLC_REGISTRY_EMAIL=<my_broadleaf_nexus_email>
At this point, you should have a locally working Broadleaf Microservices project structure with all the necessary components for a deployment to Kubernetes.
This project includes all the cryptographically unique security artifacts
and the related encrypted configuration properties located in both the security
and config folders respectively (this was generated when running the flex:generate plugin). The contents of these folders are important and uniquely tie all the components of a Broadleaf installation together. Keep note of these folders in particular, as you will be using and installing these artifacts to your Kubernetes cluster in the following tutorial.
if for some reason the contents of your securityandconfigfolders get out of sync, you can always delete them and runflex:generateagain to re-generate a full new set of unique security artifacts or just runflex:generatewhen you’ve updated / added new secrets to your credentials report to synchronize the configuration properties
Do NOT check the contents of the security folder into any source control. Please review the README in that folder and this security overview guide for more details on the contents of this directory. From an operational perspective, we recommend storing these artifacts in a secure vault location. (e.g. Google Secret Manager, Azure Key Vault, Hashicorp Vault, etc..)
For simplicity and for the purposes of this tutorial, we will not require a Secure Vault, instead we will be passing the contents of these security directories directly to the installation script from your local machine. From a CI/CD perspective, we recommend managing these in a secure vault and having your pipeline harvest these when creating resources on your cluster.
If you need to "regenerate" certs, the flex:generateprocess will NOT replace existing certs. You will need to delete thesan.txtand all the*.jksfiles in thesecuritydirectory first. It is suggested that you move them out of the dir in case you want them back.
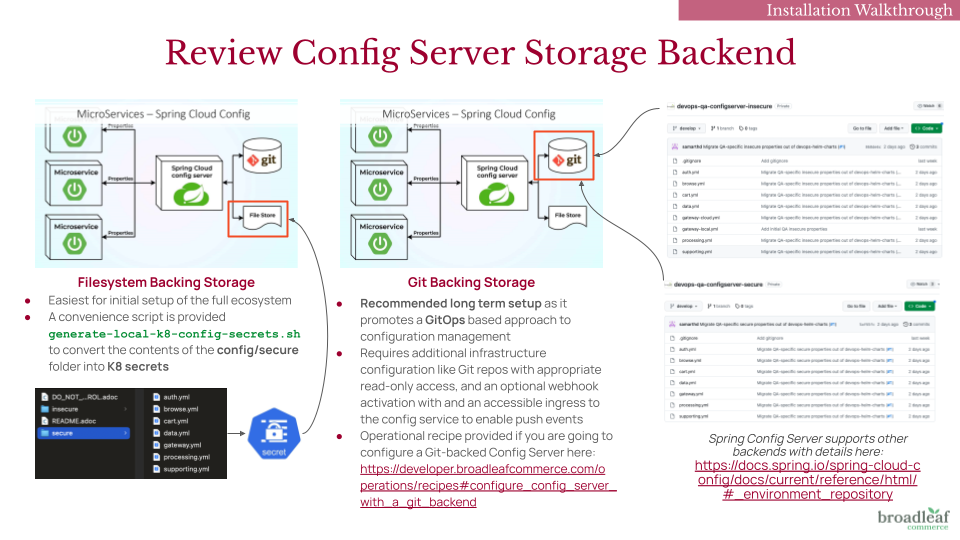
This folder contains both secure and insecure Spring properties which are meant to be loaded into Broadleaf’s Config Service (a distributed configuration service built on Spring Cloud Config). Please review the README in the config folder as well as our documentation around Environment Configuration for more details.
Spring Cloud Config supports multiple backing repositories to store these properties. When setting up a real environment, we recommend (and is also Spring’s default implementation) following a GitOps approach by creating one or more Git backends to store both the secure and insecure properties. It’s important to note that the secure properties are encrypted with unique keys (which are located in the security folder). From a best practice perspective, we would recommend creating a separate Git repo to store the secure properties and another repo to store the insecure properties. This way you can restrict access to each repo to certain users that need the ability to manage those types of properties.
For simplicity and for the purposes of this tutorial, we will not require the creation of new Git repositories to store these properties, but instead pass the contents of the configfolder directly to the installation script. For this tutorial, we will use afile-basedConfig Server backend (instead ofGit) purely for simplicity
Below you will find an image depicting two common backing storage choices for the config server and several points to consider with each:
Additionally, you will also see a helm folder that contains baseline
helm charts that describe your generated project structure deployment footprint as well as utility installation scripts to deploy these charts to an empty K8 cluster. The Helm Charts generated by the helm:generate plugin are meant to be a baseline starting point. The expectation is for you to adapt them to meet the organizational standards and processes that are specific to your implementation.
Broadleaf provides several SAMPLE DEMO images that are compatible with specific configuration choices (i.e. Balanced Flex Package Composition + Kafka Broker + Postgres + Sample Demo Data)
These sample images are primarily useful for initial testing and setting up a test Broadleaf K8 cluster. They and are not intended to be used to build out real environments (i.e. QA, UAT, Production etc…) or intended for any production use.
|
Note
|
Broadleaf does not provide sample images for all possible combination of configuration options. |
The helm charts for this tutorial will reference these pre-built "demo" docker images (i.e. enabled by using the flag -DdemoImages=true when invoking the helm:generate plugin). When setting up a project for a real implementation, you will want to integrate your own CI/CD processes (or leverage Broadleaf Cloud services) to build your own managed docker images for the custom services you generated in this initializr project.
|
Important
|
Broadleaf provides several demo accelerator storefronts and not all demo extensions are generally available. If you are trying to deploy Broadleaf sample demo images that are not the hot sauce heatclinic example - Please reach out to us to determine the availability of other sample demo images that can be deployed. |
The helm:generate plugin will produce both an ./install.sh and ./uninstall.sh script
as a reference. Note that the install.sh script steps may change based on the configuration specified in your manifest.yml file
The primary goal of the ./install.sh script is to provide a REFERENCE on how you might build your own script.
the ./install.sh script showcases the procedural steps to install the generated helm charts based on your manifest.yml configuration
The helm charts + installation script support typical Helm Override semantics and will provide a reference override value file called
values-local.yml containing some example values that showcase a simple Broadleaf deployment
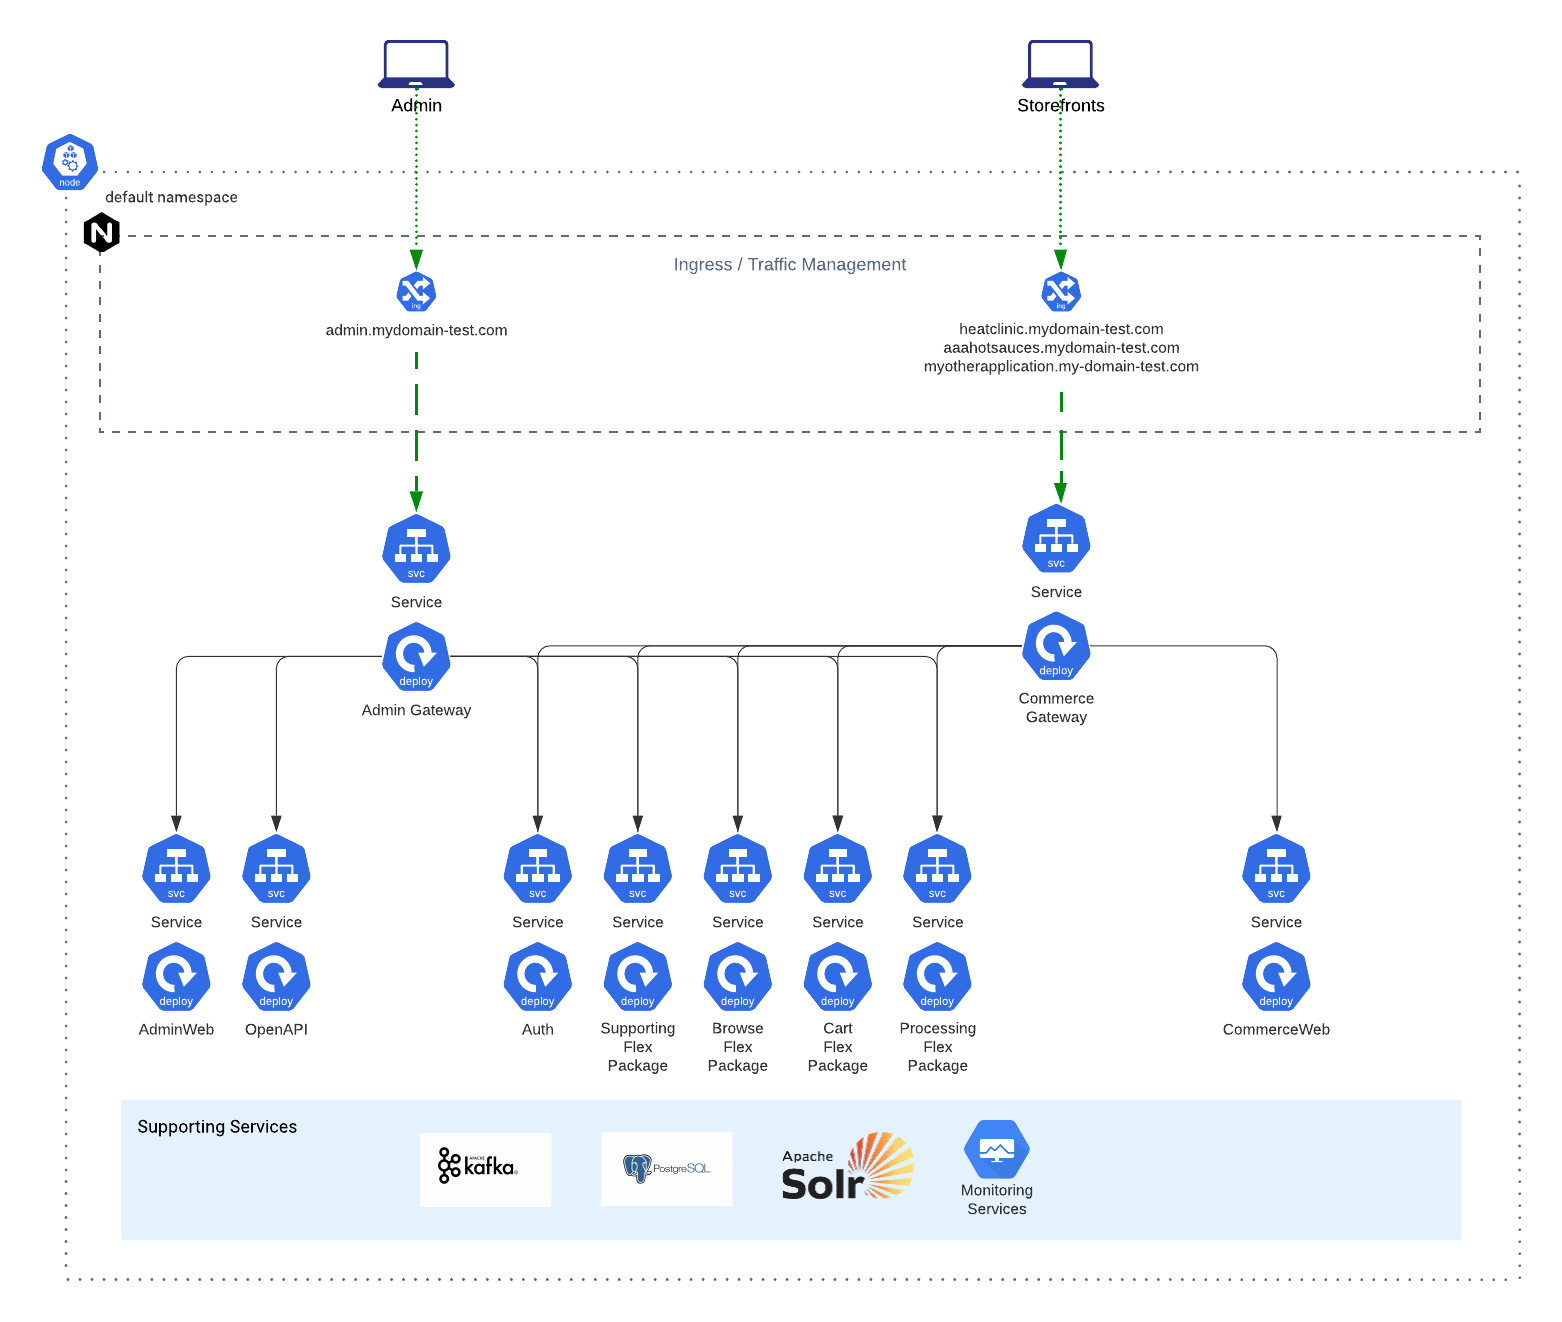
Because we recommend that most enterprises start by deploying the Balanced Flex Package, this tutorial and most of the examples you will see on this developer portal will be catered to deploying the Balanced Flex Package composition by default.
If you’re unfamiliar with the topology of the Balanced Flex Package, we recommend reviewing this High Level Architecture Overview describing the specifics of a Balanced composition.
It may also be helpful to review this example topology map to get a visual reference of the microservices footprint being deployed to Kubernetes:
In this section we will walk you through the steps of deploying the Broadleaf Platform onto a cloud-managed Kubernetes cluster. For this tutorial we reference Google’s Kubernetes Engine (GKE). Even though the steps outlined below are specific to deploying to Google Kubernetes Engine (GKE), the steps here can be extrapolated and can be used as a reference to deploy to any empty Kubernetes Cluster.
For this tutorial you will need:
a standard GKE cluster (minimum K8 version of 1.24.x) - we recommend a BS3 or BM3 as a baseline for a typical "DEV" cluster. More information about the BM3 terminology can be found in our scalability report and reference guide here. For GKE, this typically equates to a 3 node pool of machine type n2-standard-4 or n2-standard-8 using the default (cos_containerd OS)
gcloud CLI installed locally
docker installed locally
kubectl installed locally
helm installed locally
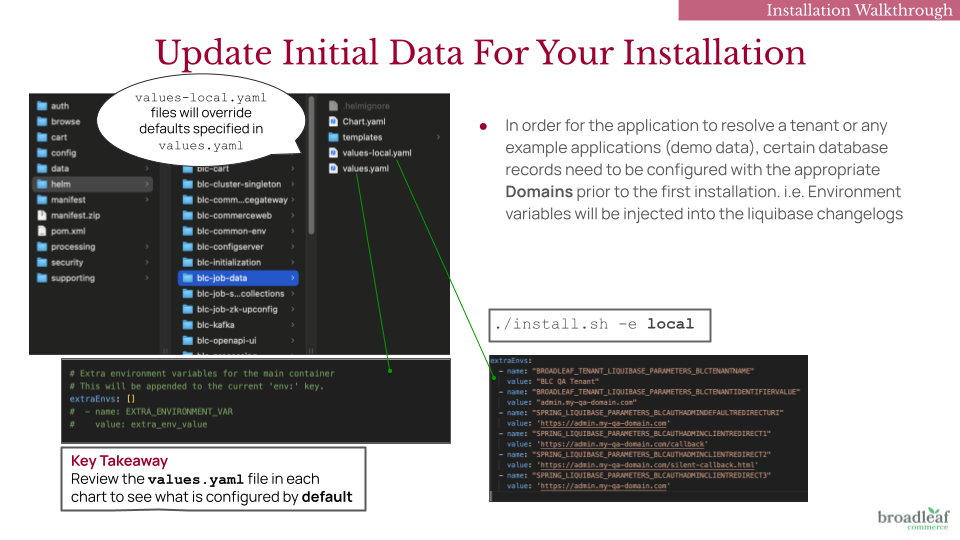
Before installing the application, certain database records must be configured with the correct Domains to ensure that a Tenant and any example storefront Applications can be properly resolved.
This setup requires two things:
Environment Variables via Helm Chart Overrides – Set and injected into the Liquibase changelogs to “pre-seed” installation data. Configuration will be outlined in later steps
Domain Configuration – The starter project and demo data assume a static, predefined domain name that supports subdomains. You will need to have one defined before starting this guide
Preferred (Production-like Setup): Use a domain you control. Ensure you can add a CNAME or A record to point to an accessible ingress.
Alternative (Local Testing Only): Modify your local /etc/hosts file to map the desired domain for development purposes.
For the purposes of this tutorial we will assume the following domain *.broadleaftutorial.com with the following provisioned application URLs:
https://admin.broadleaftutorial.com - for the back-office unified microservices admin
https://heatclinic.broadleaftutorial.com - for the hot sauce demo storefront 1
https://aaahotsauces.broadleaftutorial.com - for the hot sauce demo storefront 2
https://admin.broadleaftutorial.com - for the back-office unified microservices admin
https://telco.broadleaftutorial.com - for the telco demo storefront
|
Important
|
Broadleaf provides several demo accelerator storefronts and not all demo extensions are generally available. Please reach out to us if you have any questions around the availability and access to certain demos. Below, you will see different properties depending on which demo storefront you are trying to deploy. |
|
Tip
|
This step is applicable when deploying Broadleaf Release Trains 2.2.1+ |
Starting with Broadleaf 2.2.1+, you will need to ensure your setup has the appropriate forwarded-headers configuration. You will want to be aware of and follow the steps outlined in the Secure Forwarded Headers Configuration Operational Recipe to ensure your ingress and gateways are configured properly.
For the purposes of this tutorial, we’re going to assume you are setting up an EVALUATION NON-PRODUCTION instance and can thus follow the steps outlined for "local-development environments only" in the above recipe. This tutorial and generated install.sh script also leverages an Nginx Ingress.
Update your config/insecure/gateway-cloud.yml file to set:
spring:
  cloud:
    gateway:
      # FOR NON-PRODUCTION AND TUTORIAL PURPOSES ONLY
      # SEE RECIPE FOR FULL CONFIGURATION DETAILS
      # allow forwarded headers from anywhere
      trusted-proxies: '.*'
Make sure you merge the above property with any already defined
spring.cloud.*that may already be present in theymlproperties file.
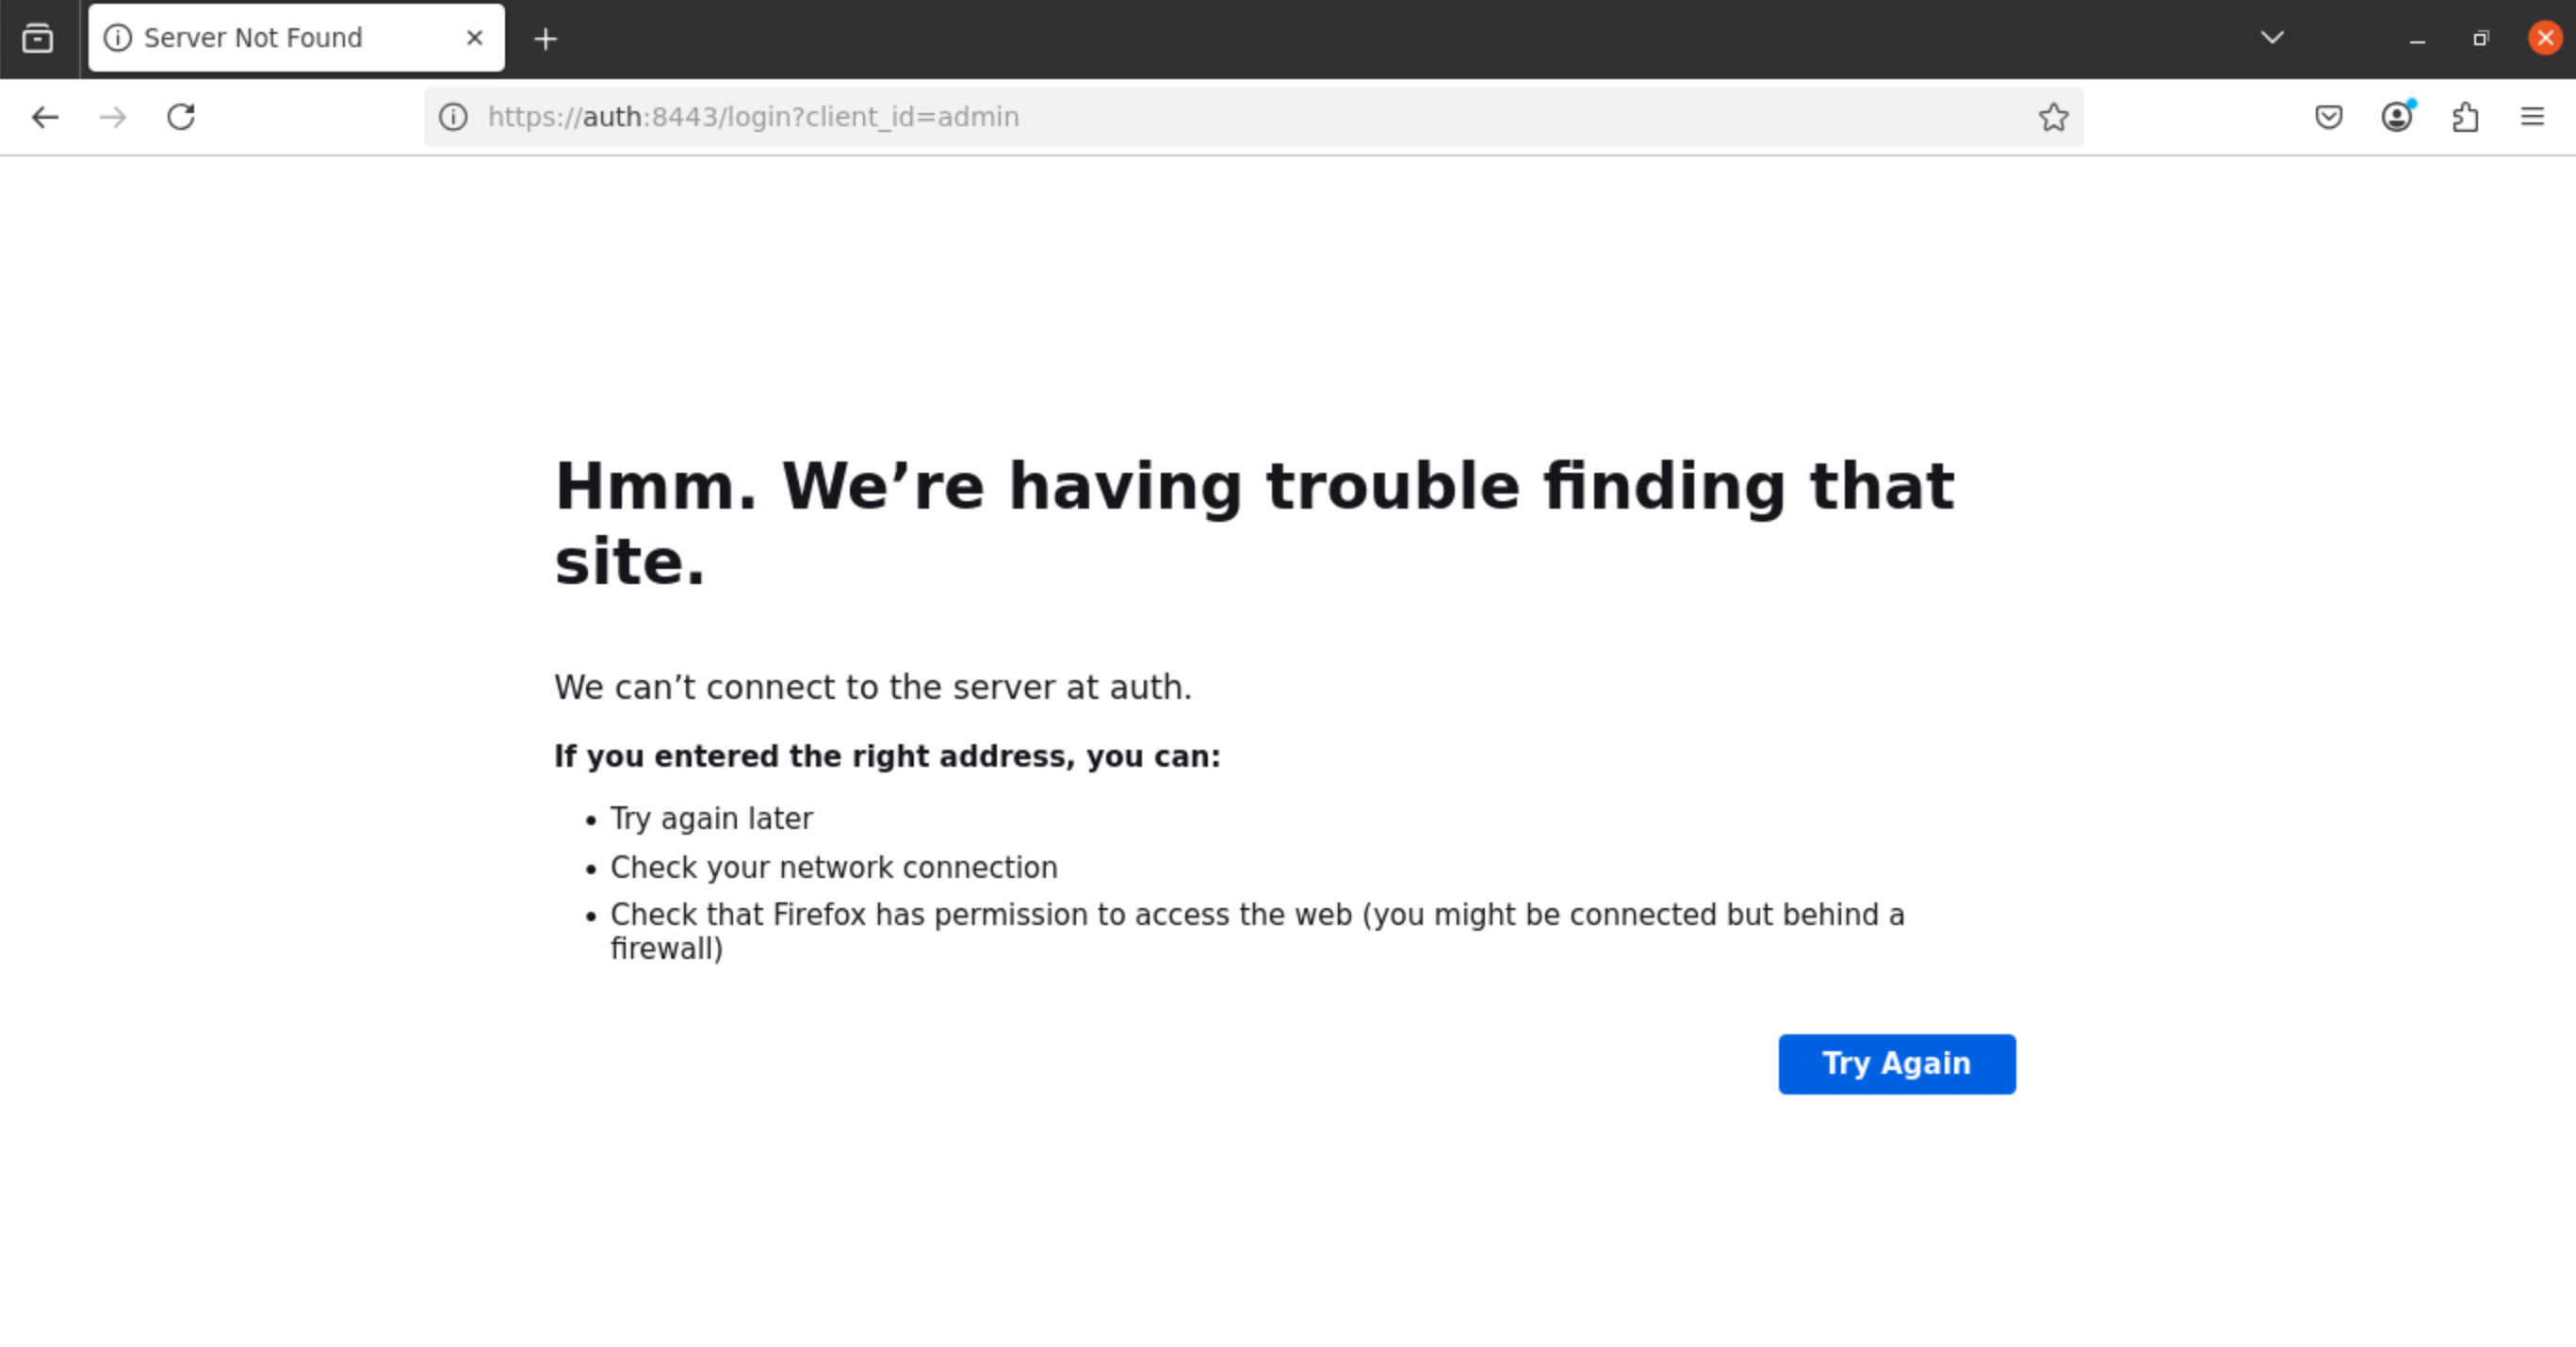
If you do not properly configure forwarded-headers and trusted-proxies, you may run into an issue accessing the Admin Console. Specifically, trying to access the typical admin url e.g. https://admin.broadleaftutorial.com may inadvertently redirect you to https://auth:8443/login?client_id=admin as shown on this screenshot
Follow the steps outlined in the Secure Forwarded Headers Configuration Operational Recipe to ensure your ingress and gateways are configured properly.
Next, let’s change the contents of your values-local.yaml files in the helm directory to use your chosen domain (in our case, *.broadleaftutorial.com) as well as override some default values to support cloud based
deployments.
Go ahead and make the following changes to these files:
For certain Broadleaf services that require a PVC, you will want to change the storage class to any native cloud provider option that supports ReadWriteMany. For this example, we will utilize the nfs storage class created by the non-production nfs-server-provisioner. This was created for you when specifying the -n true flag during execution of the install.sh script.
|
Note
|
in certain versions of the generated helm charts, the primary values.yaml files have already been updated to define nfs as the default storage class. So you may not need to override these, but again, depending on your chosen cloud provider - you may wish to change this to a cloud native storage class that supports RWX
|
helm/blc-browse/values-local.yamlpersistence:
# If you wish to support multiple Flex Package replicas containing the "asset" microservice,
# you will want to provision a PV that supports a ReadWriteMany access mode.
# NOTE: support can vary by resource provider
# See https://kubernetes.io/docs/concepts/storage/persistent-volumes/#access-modes for details.
asset:
name: blc-assets-pvc
enabled: true
accessModes:
- ReadWriteMany
size: 20Gi
storageClassName: "nfs"|
Note
|
for this tutorial, we will be installing a sample nfs server for this storage class |
helm/blc-audit-filestore/values-local.yaml|
Important
|
The Audit Filestore Helm Chart is only compatible with the 2.2.x Release Trains. You may skip this part if you do not have a generated blc-audit-filestore chart.
|
persistence:
  # When filesystem storage is enabled, The audit pvc should generally be available for all
  # flex packages as a shared filesystem for audit artifacts.
  # Similar to the blc-assets-pvc, you will want to provision a PV that supports a
  # ReadWriteMany access mode. NOTE: support can vary by resource provider
  # See https://kubernetes.io/docs/concepts/storage/persistent-volumes/#access-modes for details.
  audit:
    name: blc-audit-pvc
    enabled: true
    accessModes:
      - ReadWriteMany
    size: 20Gi
storageClassName: "nfs"helm/blc-job-data/values-local.yamlextraEnvs:
- name: "BROADLEAF_TENANT_LIQUIBASE_PARAMETERS_BLCTENANTNAME"
value: "BLC Tutorial Tenant"
- name: "BROADLEAF_TENANT_LIQUIBASE_PARAMETERS_BLCTENANTIDENTIFIERVALUE"
value: "admin.broadleaftutorial.com"
- name: "BROADLEAF_TENANT_LIQUIBASE_PARAMETERS_HEATCLINICTENANTAAAIDTYPE"
value: "DOMAIN_PREFIX"
- name: "BROADLEAF_TENANT_LIQUIBASE_PARAMETERS_HEATCLINICTENANTAAAIDVALUE"
value: "aaahotsauces"
- name: "BROADLEAF_TENANT_LIQUIBASE_PARAMETERS_HEATCLINICTENANTHEATIDTYPE"
value: "DOMAIN_PREFIX"
- name: "BROADLEAF_TENANT_LIQUIBASE_PARAMETERS_HEATCLINICTENANTHEATIDVALUE"
value: "heatclinic"
- name: "BROADLEAF_TENANT_LIQUIBASE_PARAMETERS_HEATCLINICTENANTALLSAUCEIDTYPE"
value: "DOMAIN_PREFIX"
- name: "BROADLEAF_TENANT_LIQUIBASE_PARAMETERS_HEATCLINICTENANTALLSAUCEIDVALUE"
value: "allthesauce"
- name: "SPRING_LIQUIBASE_PARAMETERS_BLCAUTHADMINDEFAULTREDIRECTURI"
value: 'https://admin.broadleaftutorial.com'
- name: "SPRING_LIQUIBASE_PARAMETERS_BLCAUTHADMINCLIENTREDIRECT1"
value: 'https://admin.broadleaftutorial.com/callback'
- name: "SPRING_LIQUIBASE_PARAMETERS_BLCAUTHADMINCLIENTREDIRECT2"
value: 'https://admin.broadleaftutorial.com/silent-callback.html'
- name: "SPRING_LIQUIBASE_PARAMETERS_BLCAUTHADMINCLIENTREDIRECT3"
value: 'https://admin.broadleaftutorial.com'
- name: "SPRING_LIQUIBASE_PARAMETERS_HEATCLINICAUTHAAADEFAULTREDIRECTURI"
value: 'https://aaahotsauces.broadleaftutorial.com'
- name: "SPRING_LIQUIBASE_PARAMETERS_HEATCLINICAUTHAAACLIENTREDIRECT1"
value: 'https://aaahotsauces.broadleaftutorial.com/silent-callback.html'
- name: "SPRING_LIQUIBASE_PARAMETERS_HEATCLINICAUTHAAACLIENTREDIRECT2"
value: 'https://aaahotsauces.broadleaftutorial.com/callback'
- name: "SPRING_LIQUIBASE_PARAMETERS_HEATCLINICAUTHAAACLIENTREDIRECT3"
value: 'https://www.aaahotsauces.broadleaftutorial.com/callback'
- name: "SPRING_LIQUIBASE_PARAMETERS_HEATCLINICAUTHAAACLIENTREDIRECT5"
value: 'https://www.aaahotsauces.broadleaftutorial.com'
- name: "SPRING_LIQUIBASE_PARAMETERS_HEATCLINICAUTHAAACLIENTREDIRECT7"
value: 'https://aaahotsauces.broadleaftutorial.com'
- name: "SPRING_LIQUIBASE_PARAMETERS_HEATCLINICAUTHAAACLIENTREDIRECT9"
value: 'https://www.aaahotsauces.broadleaftutorial.com/silent-callback.html'
- name: "SPRING_LIQUIBASE_PARAMETERS_HEATCLINICAUTHHEATDEFAULTREDIRECTURI"
value: 'https://heatclinic.broadleaftutorial.com'
- name: "SPRING_LIQUIBASE_PARAMETERS_HEATCLINICAUTHHEATCLIENTREDIRECT1"
value: 'https://heatclinic.broadleaftutorial.com/silent-callback.html'
- name: "SPRING_LIQUIBASE_PARAMETERS_HEATCLINICAUTHHEATCLIENTREDIRECT2"
value: 'https://www.heatclinic.broadleaftutorial.com/callback'
- name: "SPRING_LIQUIBASE_PARAMETERS_HEATCLINICAUTHHEATCLIENTREDIRECT4"
value: 'https://www.heatclinic.broadleaftutorial.com'
- name: "SPRING_LIQUIBASE_PARAMETERS_HEATCLINICAUTHHEATCLIENTREDIRECT5"
value: 'https://www.heatclinic.broadleaftutorial.com/silent-callback.html'
- name: "SPRING_LIQUIBASE_PARAMETERS_HEATCLINICAUTHHEATCLIENTREDIRECT7"
value: 'https://heatclinic.broadleaftutorial.com'
- name: "SPRING_LIQUIBASE_PARAMETERS_HEATCLINICAUTHHEATCLIENTREDIRECT9"
value: 'https://heatclinic.broadleaftutorial.com/callback'
- name: "SPRING_LIQUIBASE_PARAMETERS_HEATCLINICAUTHALLSAUCEDEFAULTREDIRECTURI"
value: 'https://allthesauce.broadleaftutorial.com'
- name: "SPRING_LIQUIBASE_PARAMETERS_HEATCLINICAUTHALLSAUCECLIENTREDIRECT1"
value: 'https://www.allthesauce.broadleaftutorial.com/callback'
- name: "SPRING_LIQUIBASE_PARAMETERS_HEATCLINICAUTHALLSAUCECLIENTREDIRECT3"
value: 'https://www.allthesauce.broadleaftutorial.com'
- name: "SPRING_LIQUIBASE_PARAMETERS_HEATCLINICAUTHALLSAUCECLIENTREDIRECT4"
value: 'https://www.allthesauce.broadleaftutorial.com/silent-callback.html'
- name: "SPRING_LIQUIBASE_PARAMETERS_HEATCLINICAUTHALLSAUCECLIENTREDIRECT6"
value: 'https://allthesauce.broadleaftutorial.com/callback'
- name: "SPRING_LIQUIBASE_PARAMETERS_HEATCLINICAUTHALLSAUCECLIENTREDIRECT7"
value: 'https://allthesauce.broadleaftutorial.com'
- name: "SPRING_LIQUIBASE_PARAMETERS_HEATCLINICAUTHALLSAUCECLIENTREDIRECT8"
value: 'https://allthesauce.broadleaftutorial.com/silent-callback.html'extraEnvs:
- name: "BROADLEAF_TENANT_LIQUIBASE_PARAMETERS_BLCTELCOTENANTNAME"
value: "BLC Tutorial Tenant"
- name: "BROADLEAF_TENANT_LIQUIBASE_PARAMETERS_BLCTELCOTENANTIDENTIFIERVALUE"
value: "admin.broadleaftutorial.com"
- name: "BROADLEAF_TENANT_LIQUIBASE_PARAMETERS_TELCOTENANTAPPIDTYPE"
value: "DOMAIN_PREFIX"
- name: "BROADLEAF_TENANT_LIQUIBASE_PARAMETERS_TELCOTENANTAPPIDVALUE"
value: "telco"
- name: "SPRING_LIQUIBASE_PARAMETERS_BLCTELCOAUTHADMINDEFAULTREDIRECTURI"
value: 'https://admin.broadleaftutorial.com'
- name: "SPRING_LIQUIBASE_PARAMETERS_BLCTELCOAUTHADMINCLIENTREDIRECT1"
value: 'https://admin.broadleaftutorial.com/callback'
- name: "SPRING_LIQUIBASE_PARAMETERS_BLCTELCOAUTHADMINCLIENTREDIRECT2"
value: 'https://admin.broadleaftutorial.com/silent-callback.html'
- name: "SPRING_LIQUIBASE_PARAMETERS_BLCTELCOAUTHADMINCLIENTREDIRECT3"
value: 'https://admin.broadleaftutorial.com'
- name: "SPRING_LIQUIBASE_PARAMETERS_TELCOAUTHDEFAULTREDIRECTURI"
value: 'https://telco.broadleaftutorial.com'
- name: "SPRING_LIQUIBASE_PARAMETERS_TELCOAUTHCLIENTREDIRECT1"
value: 'https://telco.broadleaftutorial.com/silent-callback.html'
- name: "SPRING_LIQUIBASE_PARAMETERS_TELCOAUTHCLIENTREDIRECT2"
value: 'https://telco.broadleaftutorial.com/callback'
- name: "SPRING_LIQUIBASE_PARAMETERS_TELCOAUTHCLIENTREDIRECT3"
value: 'https://www.telco.broadleaftutorial.com/callback'
- name: "SPRING_LIQUIBASE_PARAMETERS_TELCOAUTHCLIENTREDIRECT4"
value: 'https://www.telco.broadleaftutorial.com'
- name: "SPRING_LIQUIBASE_PARAMETERS_TELCOAUTHCLIENTREDIRECT5"
value: 'https://www.telco.broadleaftutorial.com/silent-callback.html'
- name: "SPRING_LIQUIBASE_PARAMETERS_TELCOAUTHCLIENTREDIRECT7"
value: 'https://telco.broadleaftutorial.com'
- name: "SPRING_LIQUIBASE_PARAMETERS_TELCOAUTHCLIENTREDIRECT9"
value: 'https://www.telco.broadleaftutorial.com/silent-callback.html'
- name: "SPRING_LIQUIBASE_PARAMETERS_TELCOAUTHCLIENTREDIRECT10"
value: 'https://telco.broadleaftutorial.com/my-account-quotes'helm/blc-supporting/values-local.yamlenv:
BROADLEAF_SEARCH_SOLR_SERVER_HOST: zookeeper-0.zookeeper-headless.default.svc.cluster.local:2181
BROADLEAF_SEARCH_SOLR_SERVER_CHROOT: /solr
extraEnvs:
- name: SPRING_LIQUIBASE_PARAMETERS_BLCTENANTIDENTIFIERVALUE
value: admin.broadleaftutorial.com
- name: BROADLEAF_TENANT_URLRESOLVER_APPLICATION_SCHEME
value: https
- name: BROADLEAF_TENANT_URLRESOLVER_APPLICATION_DOMAIN
value: broadleaftutorial.com
- name: BROADLEAF_TENANT_URLRESOLVER_APPLICATION_PORT
value: '443'
- name: BROADLEAF_TENANT_URLRESOLVER_ADMIN_SCHEME
value: https
- name: BROADLEAF_TENANT_URLRESOLVER_ADMIN_DOMAIN
value: admin.broadleaftutorial.com
- name: BROADLEAF_TENANT_URLRESOLVER_ADMIN_PORT
value: '443'helm/local-ingress/templates/ingress.yamlapiVersion: networking.k8s.io/v1
kind: Ingress
metadata:
name: ms-basic-ingress
annotations:
kubernetes.io/ingress.class: nginx
nginx.ingress.kubernetes.io/proxy-max-temp-file-size: "20m"
nginx.ingress.kubernetes.io/proxy-body-size: "20m"
spec:
tls:
- hosts:
- heatclinic.broadleaftutorial.com
- aaahotsauces.broadleaftutorial.com
- allthesauce.broadleaftutorial.com
- admin.broadleaftutorial.com
secretName: ingress-tls
rules:
- host: heatclinic.broadleaftutorial.com
http:
paths:
- path: /
pathType: Prefix
backend:
service:
name: commercegateway
port:
number: 8456
- host: aaahotsauces.broadleaftutorial.com
http:
paths:
- path: /
pathType: Prefix
backend:
service:
name: commercegateway
port:
number: 8456
- host: allthesauce.broadleaftutorial.com
http:
paths:
- path: /
pathType: Prefix
backend:
service:
name: commercegateway
port:
number: 8456
- host: admin.broadleaftutorial.com
http:
paths:
- path: /
pathType: Prefix
backend:
service:
name: admingateway
port:
number: 8446apiVersion: networking.k8s.io/v1
kind: Ingress
metadata:
name: ms-basic-ingress
annotations:
kubernetes.io/ingress.class: nginx
nginx.ingress.kubernetes.io/proxy-max-temp-file-size: "20m"
nginx.ingress.kubernetes.io/proxy-body-size: "20m"
spec:
tls:
- hosts:
- telco.broadleaftutorial.com
- admin.broadleaftutorial.com
secretName: ingress-tls
rules:
- host: telco.broadleaftutorial.com
http:
paths:
- path: /
pathType: Prefix
backend:
service:
name: commercegateway
port:
number: 8456
- host: admin.broadleaftutorial.com
http:
paths:
- path: /
pathType: Prefix
backend:
service:
name: admingateway
port:
number: 8446Broadleaf is secure by default and every installation of Broadleaf generates cryptographically unique Security Artifacts. For the purposes of this tutorial, we will create Kubernetes Secrets from the contents inside your generated config directory and mount this K8 secret as a file-backed repo for the Config Service.
In your helm directory, we’ve provided a utility script to help with this process.
cd helm directory
run ./generate-local-k8-config-secrets.sh
this script will look in the parent directory of the current helm directory for a config folder in which it will attempt to create Kubernetes secret files from them
If successful, you should see the files do-not-commit-secure-secret.yaml and do-not-commit-insecure-secret.yaml emitted to the helm directory
keep note of these new K8 secret files as they will be used for installation
Again as mentioned earlier, for a real project setup, we recommend a GitOps approach by configuring your Config Server to point to Git Backends to manage your secureandinsecureproperty files, however for simplicity we are using afile-basedapproach for this tutorial.
|
Tip
|
If trying to build a local secret to back the config service in K8 (i.e. using generate-local-k8.sh) you may run into the following error running the install.sh script when performing kubectl apply:
|
The Secret "secure-secret" is invalid: metadata.annotations: Too long: must have at most 262144 byteIf you receive this error, there is a workaround where you can change the ./install.sh to run the following
instead: kubectl apply --server-side=true --force-conflicts -f <my-secret-file>.yml
the installation process for this tutorial assumes that all resources will be installed to the defaultnamespace. If you need to deploy these resources to a different namespace, see the Advanced Configuration and Considerations section at the end of this tutorial
Authenticate with the gcloud sdk (gcloud auth login)
Grab the connection info for your GKE cluster associated with your Google Project
gcloud container clusters get-credentials <my-cluster> --zone <my-zone> --project <my-project>
Validate that that your current kubectl context is pointing to the GKE cluster you are connected to. (i.e. run kubectl config current-context)
cd into the helm directory
run: LOCAL_INITIALIZR_PROJECT_DIR_PATH=../ ./install.sh -k true -e local -n true
The -k flag indicates that you’ve generated the do-not-commit-secure-secret.yaml and the do-not-commit-insecure-secret.yaml previously and the installation script should apply these as part of the installation process.
The -e flag allows the script to apply any environment specific logic as part of the installation. For example, apply any blc-chart/values-<env>.yaml files as an override as part of a helm installation
The -n flag indicates that the process should provision a sample nfs server. This is just used as a reference to supports ReadWriteMany file mounts for the Broadleaf Asset Service and the Audit Service. Typically you would integrate with a cloud native solution that supports ReadWriteMany for the blc-assets-pvc and blc-audit-pvc
TIP: the ./install.sh script is structured to be idempotent (i.e. you have the ability to run this same script multiple times. It installs the charts if they are not already installed. If they are already installed, it upgrades them.)
The installation script may take a few minutes to complete
Complete Startup Time: from an empty cluster to all containers being available may take up to 6-8 minutes
Finally, we can create an NGINX Controller For GKE (https://kubernetes.github.io/ingress-nginx/deploy/#gce-gke):
kubectl create clusterrolebinding cluster-admin-binding \
  --clusterrole cluster-admin \
  --user $(gcloud config get-value account)

kubectl apply -f https://raw.githubusercontent.com/kubernetes/ingress-nginx/controller-v1.8.1/deploy/static/provider/cloud/deploy.yaml
After a few minutes applying the NGINX controller, you should be assigned an IP for the ms-basic-ingress that was created
kubectl describe ingress ms-basic-ingress
Grab this IP and either create a CNAME or A record on your DNS Provider or change your local /etc/hosts file to point your configured domains to this allocated IP
After all containers are up, you should now be able to visit the following in your browser:
Admin Console: https://admin.broadleaftutorial.com
Username: master@test.com
Password: <dynamically generated>
|
Note
|
the default passwords for the initial admin master users are dynamically generated and can be found in your security folder in your credentials-report.env file.
|
If you enabled the "Hot Sauce Demo" on your manifest.yml,
the following demo storefronts are also accessible:
Storefront 1: https://heatclinic.broadleaftutorial.com
Storefront 2: https://aaahotsauces.broadleaftutorial.com
If you enabled the "Telco Demo" on your manifest.yml,
the following demo storefronts are also accessible:
Storefront 1: https://telco.broadleaftutorial.com
Inside the helm folder, you should also find an uninstall.sh script. You can run this script to clean up any installed K8 resources on your current GKE cluster
Now that you have an evaluation cluster running with example demo images, here are some common next steps
Without any changes, the tutorial above with the default generated helm charts will deploy an EPHEMERAL PostgreSQL instance - i.e. the data in your Postgres DB will be cleared if the pod restarts. While you can configure a persistent disk and manage the DB within your K8 cluster, most implementations will opt to utilize a Cloud Native or externally-managed data store.
For example:
To point to a cloud native or externally managed database, you can follow the Recipe to update your DB connection information
Remember, the expectation is for you to build your own Flex Package images as part of your Broadleaf implementation. The images we provide for this tutorial are SAMPLE DEMO images that have pre-defined assumptions and example demo data.
Take a look at our CI/CD & Project Blueprint describing the typical project setup and overall build considerations needed for your overall Broadleaf implementation.
As a DevOps and SRE Team looking to effectively manage a Broadleaf installation, it will be helpful to be familiar with common operational recipes and tasks for setting up, managing, and operating a Broadleaf Microservices Ecosystem
As mentioned before, if you followed this tutorial specifying all the default installation parameters, you would have installed the Broadleaf Platform using assumptions and configuration catered to a NON PRODUCTION EVALUATION cluster.
As you start building out your actual Broadleaf implementation, you will want to consider more "production-ready" and advanced configurations.
Check out the Advanced Configuration and Considerations section below for more details on things like:
Configuring ZK, Kafka, and Solr for a Production Quorum
Deploying to different K8 namespaces
and more….
The helm:generate plugin generates a values-local.yaml with override configurations that are catered to deploying a "minimal evaluation" footprint i.e. some values that are specified in the values-local.yaml explicitly specify single node deployments for certain services to make deploying to a local developer easier to work with.
Specifically, with the values-local.yaml files, we’ve configured properties to only deploy a "single node" Zookeeper, Kafka, and Solr cluster.
The configurations for a "single node" configuration can be found in these files:
helm/blc-common-env/values-local.yaml
data:
  SPRING_CLOUD_STREAM_KAFKA_BINDER_BROKERS: 'kafkacluster-0.kafkacluster-headless.default.svc.cluster.local:9094'
  SPRING_CLOUD_STREAM_KAFKA_BINDER_ZKNODES: 'zookeeper-0.zookeeper-headless.default.svc.cluster.local:2181'
helm/blc-configserver/values-local.yaml
env:
  SPRING_CLOUD_STREAM_KAFKA_BINDER_BROKERS: 'kafkacluster-0.kafkacluster-headless.default.svc.cluster.local:9094'
  SPRING_CLOUD_STREAM_KAFKA_BINDER_ZKNODES: 'zookeeper-0.zookeeper-headless.default.svc.cluster.local:2181'
helm/blc-[flexpackage]/values-local.yaml
env:
  BROADLEAF_SEARCH_SOLR_SERVER_HOST: zookeeper-0.zookeeper-headless.default.svc.cluster.local:2181
helm/blc-job-solr-create-collections/values-local.yaml
env:
  ZK_HOST: zookeeper-0.zookeeper-headless.default.svc.cluster.local:2181
  CHECK_SOLR_LIST: '"solr-0.solr-headless:8983/solr/admin/cores?action=STATUS"'
  BLC_COLLECTIONS_REPLICATION_FACTOR: 1
helm/blc-job-zk-upconfig/values-local.yaml
env:
  ZK_HOST: zookeeper-0.zookeeper-headless.default.svc.cluster.local:2181
helm/blc-kafka/values-local.yaml
replicaCount: 1
env:
  KAFKA_ZOOKEEPER_CONNECT: zookeeper-0.zookeeper-headless.default.svc.cluster.local:2181/broadleaf/kafka
  KAFKA_OFFSETS_TOPIC_REPLICATION_FACTOR: 1
  CHECK_ZK_LIST: '"zookeeper"'
helm/blc-solr/values-local.yaml
replicaCount: 1
env:
  SPRING_CLOUD_STREAM_KAFKA_BINDER_BROKERS: kafkacluster-0.kafkacluster-headless.default.svc.cluster.local:9094
  SPRING_CLOUD_STREAM_KAFKA_BINDER_ZKNODES: zookeeper-0.zookeeper-headless.default.svc.cluster.local:2181
  ZK_HOST: zookeeper-0.zookeeper-headless.default.svc.cluster.local:2181
  ZK_CHROOT: /solr
  CHECK_ZK_LIST: '"zookeeper-0.zookeeper-headless.default.svc.cluster.local:2181"'
  SOLR_HOST: solr
  SOLR_PORT: 8983
if you are going from single-node cluster to the "Full Quorum" 3-node cluster as described in the next section: "Full Quorum" Production Considerations, make sure to remove the SOLR_HOSTproperty (along with the rest of the properties defined here) even though it is not defined in the basevalues.yamlfile. ThisSOLR_HOSTproperty is only needed in a single-node cluster setup.
helm/blc-solr-exporter/values-local.yaml
replicaCount: 1
env:
  ZK_HOST: zookeeper-0.zookeeper-headless.default.svc.cluster.local:2181
  CHECK_ZK_LIST: '"zookeeper-0.zookeeper-headless.default.svc.cluster.local:2181"'
helm/blc-zookeeper/values-local.yaml
replicaCount: 1
zkServers: zookeeper-0.zookeeper-headless.default.svc.cluster.local:2888:3888
In an actual production environment, it is recommended that you deploy a minimum 3 node StatefulSet for Zookeeper, Kafka, and Solr to maintain quorum capabilities. This is already the default configuration for the "base" values.yaml chart. You’ll want to make sure to utilize that minimum 3-node "base" configuration for your production environments. Specifically, all you have to do is explicitly REMOVE ALL the "single-node configuration" properties listed above (as it will then default to the base values.yaml files).
You may notice that during the installation process, there is a step that installs a community version of the kube-prometheus-stack (https://github.com/prometheus-community/helm-charts/tree/main/charts/kube-prometheus-stack).
Many K8 clusters may already come pre-installed with some prometheus components on it, however the reason we include it in our default installation steps are because Broadleaf’s Flex Packages come pre-configured with an optional Spring Component called
PrometheusDependencyCheck This is an optional component that can be enabled that makes use of a prometheus installed on your cluster. More details can be found in the JavaDocs here: https://javadocs.ci.broadleafcommerce.com/broadleaf-common-extension/1.4.18-GA/com/broadleafcommerce/common/extension/PrometheusDependencyCheck.html
This optional Dependency Check component can be configured to call out to a prometheus API and gather data on whether a particular service is up before continuing with a startup process.
the default helm charts specify some default environment variables that enable this dependency check for certain services. For example, in the below image on the right, you can see some ENV variables specified on the browse,cart,processing, andsupportingflex packages. These properties indicate that “zookeeper” and “Kafka” should be available (via the Prometheus Dependency Check) before starting up…
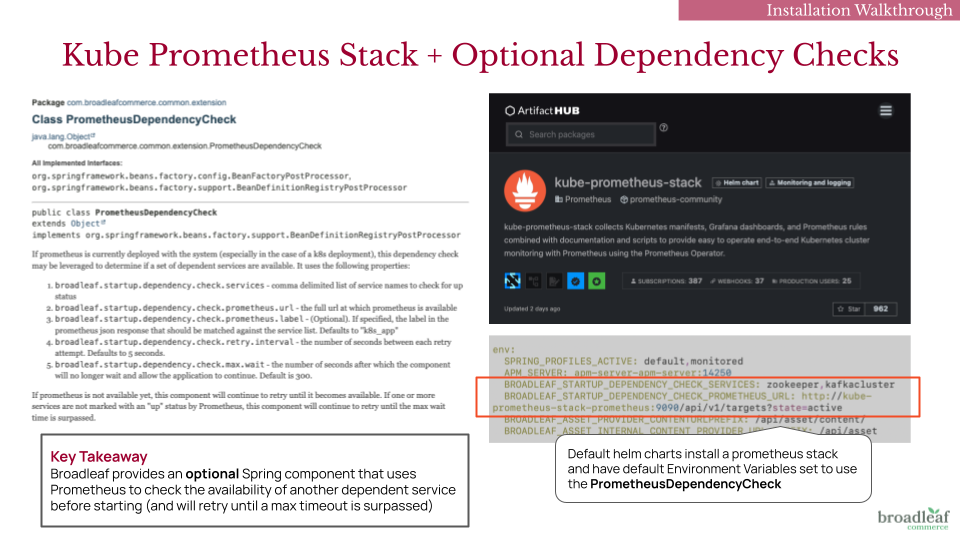
You can disable this dependency check by removing the following ENV properties from your helm charts:
env:
  BROADLEAF_STARTUP_DEPENDENCY_CHECK_SERVICES: ...
  BROADLEAF_STARTUP_DEPENDENCY_CHECK_PROMETHEUS_URL: ...
By default, all helm charts and scripts provided assume an installation into the default namespace.
If you intend to deploy to a namespace other than default, you will want to review
all the values.yml and values-local.yml files in your generated helm charts
and update any URIs that specifically utilize the default namespace.
As an example: the default "values" in helm/blc-common-env/values-local.yaml might include properties like:
data:
  SPRING_CLOUD_STREAM_KAFKA_BINDER_BROKERS: 'kafkacluster-0.kafkacluster-headless.default.svc.cluster.local:9094'
  SPRING_CLOUD_STREAM_KAFKA_BINDER_ZKNODES: 'zookeeper-0.zookeeper-headless.default.svc.cluster.local:2181'
If you intend to deploy to a different namespace e.g. mynamespace, then you will need to update
the values to be:
data:
  SPRING_CLOUD_STREAM_KAFKA_BINDER_BROKERS: 'kafkacluster-0.kafkacluster-headless.mynamespace.svc.cluster.local:9094'
  SPRING_CLOUD_STREAM_KAFKA_BINDER_ZKNODES: 'zookeeper-0.zookeeper-headless.mynamespace.svc.cluster.local:2181'
Broadleaf by default will generate unique Security Artifacts e.g. https-keystore.jks and kafka-keystore.jks when you run flex:generate. These are self-signed certs that are configured with the appropriate Subject Alternative Names (SAN) for SSL verification purposes. The default SANs configured utilize fully qualified domains assuming the default namespace. If you are deploying a component to a different namespace, you will need to inform the system of your custom namespace.
For example, if you are deploying Kafka to the K8 cluster not under the default namespace, you will need to generate new SSL certs with an updated alternate SAN list (in order for SSL to work).
You can update your manifest.yml file to support your mynamespace namespace:
- name: broker
  platform: kafka
  descriptor: snippets/docker-kafka.yml
  enabled: true
  domain:
    alternates:
    - kafkacluster-0.kafkacluster-headless.mynamespace.svc.cluster.local
    - kafkacluster-0.kafkacluster-headless.mynamespace.svc.cluster
    - kafkacluster-0.kafkacluster-headless.mynamespace.svc
    - kafkacluster-0.kafkacluster-headless.mynamespace
    - kafkacluster-0.kafkacluster-headless.default.svc.cluster.local
    - kafkacluster-0.kafkacluster-headless.default.svc.cluster
    - kafkacluster-0.kafkacluster-headless.default.svc
    - kafkacluster-0.kafkacluster-headless.default
    - kafkacluster-0.kafkacluster-headless
    - kafkacluster-1.kafkacluster-headless.mynamespace.svc.cluster.local
    - kafkacluster-1.kafkacluster-headless.mynamespace.svc.cluster
    - kafkacluster-1.kafkacluster-headless.mynamespace.svc
    - kafkacluster-1.kafkacluster-headless.mynamespace
    - kafkacluster-1.kafkacluster-headless.default.svc.cluster.local
    - kafkacluster-1.kafkacluster-headless.default.svc.cluster
    - kafkacluster-1.kafkacluster-headless.default.svc
    - kafkacluster-1.kafkacluster-headless.default
    - kafkacluster-1.kafkacluster-headless
    - kafkacluster-2.kafkacluster-headless.mynamespace.svc.cluster.local
    - kafkacluster-2.kafkacluster-headless.mynamespace.svc.cluster
    - kafkacluster-2.kafkacluster-headless.mynamespace.svc
    - kafkacluster-2.kafkacluster-headless.mynamespace
    - kafkacluster-2.kafkacluster-headless.default.svc.cluster.local
    - kafkacluster-2.kafkacluster-headless.default.svc.cluster
    - kafkacluster-2.kafkacluster-headless.default.svc
    - kafkacluster-2.kafkacluster-headless.default
    - kafkacluster-2.kafkacluster-headless
    cloud: localkafka
    docker: localkafka
    local: localhost
Once updated, you can run a ./mvnw clean install flex:generate which will update all the appropriate
security artifacts in your security config directory.
If you forget to update the above, you may run into an SSL handshake failed error:
org.apache.kafka.common.errors.SslAuthenticationException: SSL handshake failed
Caused by: javax.net.ssl.SSLHandshakeException: No subject alternative DNS name matching kafkacluster-0.kafkacluster-headless.mynamespace.svc.cluster.local found.
or a CertificateException
Caused by: java.security.cert.CertificateException: No subject alternative DNS name matching kafkacluster-1.kafkacluster-headless.mynamespace.svc.cluster.local found.
you can run the following command to validate the generated certs in the security folder: keytool -v -list -keystore kafka-keystore.jks
If you plan to deploy the Flex Packages to a namespace other than default, all of the services support the definition of the alternatives field - it will correctly add everything to the certificates as required.
For example, in your manifest.yml, you can set domain.alternates as needed:
flexPackages:
- name: supporting
  domain:
    alternates:
    - supporting.mynamespace.svc.cluster.local
    - supporting.mynamespace.svc.cluster
    - supporting.mynamespace.svc
    - supporting.mynamespace
    - supporting
    cloud: supporting.mynamespace.svc.cluster.local
    docker: supporting
    local: localhost
  enabled: true
  flexUnits: adminnav,adminuser,metadata,notification,sandbox,search,tenant
  messageInterlink:
    suppressed: true
    tenantSync: true
  ports:
  - debug: true
    port: 9007
    targetPort: 9007
  - port: 9457
    targetPort: 9457
More details around this configuration can be found in our JavaDocs for the Manifest Schema.