java -version
- v1.0.0-latest-prod
Broadleaf Microservices is a headless commerce platform made up of 30+ independently deployable Java/Spring services, fronted by reference Node.js/React applications.
This page is the starting point for evaluating it. It covers the two evaluation paths available to you, how to get access, how to prepare a developer machine, and how to generate a running project.
Broadleaf offers two distinct journey paths for developers looking to experience and work with Broadleaf Microservices. Use the table below to self-select, then read the matching section.
| Frontend / Storefront Developer Path | Full-Stack & Backend Commerce API Developer Path | |
|---|---|---|
Best for |
Building or exploring a consumer-facing experience against real commerce APIs |
Understanding, extending, and customizing the commerce services themselves |
Where it runs |
A free, dedicated, Broadleaf-provisioned demo environment on Broadleaf Cloud |
Your own machine — all services and supporting containers run locally |
What you get |
Your own dedicated storefront and administration console, plus an Open API interface against your instance |
The full ecosystem: 30+ Java/Spring microservices, an accelerator storefront, and a React admin console |
Prerequisites |
A browser |
A modern developer machine, Java, a container runtime, and OpenSSL (see Prepare Your Machine) |
Access required |
An Enterprise License or limited-term developer evaluation credentials — contact us to request access |
|
Start here |
|
Tip
|
The two paths are not mutually exclusive. Many teams request a hosted demo for frontend work while a backend developer runs the full stack locally. |
As a frontend or storefront commerce developer, you can take advantage of Broadleaf’s free dedicated provisioned demo environment on Broadleaf Cloud. Here’s what this path entails:
Dedicated Hosted Instance: You’ll have your own dedicated storefront and an administration console.
Out-of-the-Box Commerce APIs: Broadleaf exposes out-of-the-box commerce APIs that you can use to interact with your dedicated storefront. Frontend developers can leverage your own Open API interface to explore and query your dedicated instance.
Catalog Management: Upload your own catalog, create promotions, and manage discounts — all within your own dedicated instance.
Commerce Features: Perform typical commerce functions like add to cart, checkout, and order management directly on your dedicated environment.
Ideal Starting Learning Path: This path is perfect for developers who want to experience Broadleaf APIs and capabilities without the need to set up and run a full backend commerce API ecosystem locally.
Next steps for this path:
When your demo is provisioned, follow the Broadleaf Microservices API Tutorial to learn how to use and make the most out of your own dedicated instance.
If you’re a full-stack or backend commerce API developer, Broadleaf provides a comprehensive developer experience that allows you to run the entire microservices ecosystem on your local machine. Here’s what this path offers:
Local Development Environment: Run all 30+ Java and Spring microservices locally.
Accelerator Projects & Supporting Services: Launch various supporting containers that supplement the full commerce journey, such as an accelerator storefront and an admin console built in React.
Full Extensibility: Broadleaf is unique in that you have full extensibility options to make the platform your own. Running locally gives you a hands-on look at core framework concepts and key extension patterns.
Ideal Project Starting Point: This path provides a good foundational starting point to begin building customizations for your specific commerce implementation.
Developer Evaluation Credentials: Free limited-term evaluation credentials are available — contact us to request access.
Minimum System Requirements: Before you begin, ensure that your system meets the recommended requirements for running the full stack locally.
The rest of this guide is focused on the things that are needed to support a full-stack and backend commerce API developer experience. If you’re interested in learning about the extensibility of the platform and are looking to run the full stack locally, keep on reading.
Four things stand between you and a running local ecosystem:
Get access: an Enterprise License or evaluation credentials for Broadleaf’s Docker Registry and Maven Nexus. See Get Access.
Prepare your machine: Java, a container runtime, and OpenSSL. See Prepare Your Machine.
Generate a project: use the Broadleaf Project Initializr to produce a manifest project tailored to your target release train and deployment shape. See Generate and Run Your Project.
Build and run: follow the HELP.md in your generated manifest project, then start exploring.
|
Important
|
Step 1 is a hard gate. Broadleaf artifacts are served from private registries, so builds and image pulls will fail without credentials. Request access before you invest time in machine setup. |
In order to get started running Broadleaf Microservices locally, you will need to obtain a few resources and credentials before working through the installation instructions outlined below.
|
Note
|
Already have an Enterprise License? Proceed with the instructions below. Don’t have one yet? Contact us to request access. Our team will provision either free limited-term developer evaluation credentials or full Enterprise License credentials, depending on what fits your evaluation. |
Broadleaf licensed clients get access to Broadleaf’s Docker Registry, Maven Nexus, and NPM Repository in order to build and run these starter projects. Once you have obtained these credentials, you will need to configure them appropriately (which will be outlined in the relevant sections below).
|
Important
|
Broadleaf’s private NPM Repository is available to Enterprise License Holders only. It is not included with developer evaluation credentials. Running the full local stack does not require it — the storefront accelerator and admin console run as prebuilt container images pulled from Broadleaf’s Docker registry. NPM access is only needed to install Broadleaf’s |
When your developer evaluation is approved, you should receive an email with getting started instructions that include a username, password, and an expiration date.
You should be aware that there are slightly different "Getting Started" steps that are only applicable to Evaluation Credentials. As you are following any of the getting started guides on this portal, make sure to pay attention to any instructions that call out different steps needed for "Evaluation Credential Holders".
The practical difference is which repositories you are entitled to:
| Enterprise License Credentials | Evaluation Credentials | |
|---|---|---|
Docker registry |
|
|
Maven artifacts |
Broadleaf’s primary repository |
Broadleaf’s evaluation mirror repository |
Private NPM Repository ( |
Included |
Not included — Enterprise License only |
Scope |
The full suite of Broadleaf resources, per your license |
A limited-term subset sufficient to evaluate the platform |
|
Tip
|
A complete list of the differentiated steps between Enterprise License Credentials and Evaluation Credentials — including ~/.m2/settings.xml mirror configuration and the extra docker-compose:generate flags — can be found on the Evaluation Credentials page. Read it before your first build if you hold evaluation credentials.
|
You have evaluation credentials if:
You requested a developer evaluation through our contact form and were provisioned limited-term credentials.
You’ve received a username that starts with eval-.
Below you will find the prerequisites needed to support a full-stack and backend commerce API developer learning path.
Work through the sections that follow, then confirm each item before generating a project:
| Requirement | Target | Verify with |
|---|---|---|
10-core CPU / 32 GB memory recommended (8-core / 16 GB minimum) |
— |
|
Java/Spring plus React/Next.js support |
— |
|
Java 21 for the latest release trains |
|
|
Docker CLI plus Docker Compose, resources raised above defaults |
|
|
Logged in to the Broadleaf registry that matches your credentials |
|
|
Version >= 3.1.x recommended |
|
Running the full microservices stack locally (which includes running multiple Docker containers and JVM applications) requires a modern-day developer machine (x86 and ARM systems are both supported) with the following setup:
Recommended System Specs:
OS Support: MacOS, Windows, Linux
10-core CPU (8-core minimum)
32 GB Memory (16 GB minimum)
|
Tip
|
Meeting the CPU and memory spec is not enough on its own — your container runtime also has to be allowed to use it. See Sizing Your Container Engine. |
We also recommend that you have an IDE (or IDEs) set up that can support Java and Spring development from a backend commerce API perspective and React/Next.js application development from a frontend consumer experience perspective. Popular choices that we recommend include IntelliJ IDEA and Visual Studio Code.
|
Tip
|
If you use IntelliJ IDEA, the IntelliJ Setup guide covers run configurations for the generated project. |
You will need Java 21 installed on your machine to support the latest release trains. We recommend Adoptium Eclipse Temurin. See more details about supported Java versions here.
| Release Train | Java Compatibility |
|---|---|
< 1.8.1 |
Java 11 |
>= 1.8.1 & < 2.x |
Java 11 or 17 |
>= 2.x |
Java 17 |
>= 2.1.4, 2.2.0, and beyond |
Java 17 or 21 |
java -versionIn order to run the supporting services (e.g. Zookeeper, SOLR, Kafka, etc…) that underpin the Broadleaf ecosystem, you will need to have a Container Runtime and Container Management Platform that supports the Docker Client/CLI and Docker Compose.
There are several container management platforms that facilitate the creation, deployment, and management of containers on a local machine, often for development, testing, and smaller-scale deployments.
Options include:
OrbStack (Recommended for MacOS): A fast, lightweight Docker and Linux runtime built specifically for macOS. It is a drop-in Docker Desktop replacement that ships the Docker CLI, Compose, and buildx, and allocates CPU and memory on demand instead of reserving a fixed-size virtual machine. Requires macOS 14.0 or newer.
Rancher Desktop (Recommended for Windows and Linux): An open-source desktop application that provides a local Kubernetes and container management environment. It offers a choice of Kubernetes versions and container runtimes (containerd or dockerd). It also runs on MacOS.
Docker Desktop: A popular all-in-one solution for managing containers and images, with CLI and Kubernetes support. Note that commercial restrictions may apply, and users may encounter certain OS limitations based on the versions used.
Other Docker-CLI-compatible runtimes can also work, but the options above are what these guides are written and tested against.
|
Note
|
Installing a container management platform like OrbStack or Rancher Desktop will also install an underlying container engine as well as other helpful utilities like the Docker Client, allowing you to use familiar commands like docker build, docker run, and compose, which are used and referenced in the processes described below. Rancher Desktop installs containerd by default; OrbStack registers a Docker context named orbstack that the docker CLI uses automatically.
|
|
Important
|
Whichever platform you choose, its default resource limits are too low for the full Broadleaf stack. Configure them before your first run — see Sizing Your Container Engine. |
Once you have a container engine installed, you will want to authenticate with Broadleaf’s container registry, enabling you to pull down Broadleaf container images. The registry you log in to depends on which type of credentials you were provisioned.
For Enterprise License Holders:
docker login repository.broadleafcommerce.com:5001For Evaluation Credential Holders:
docker login https://evaluation.docker.blcdemo.comWhen prompted, type in the username and password you were provisioned.
|
Tip
|
Not sure which set you have? See How do I know if I have evaluation credentials?. |
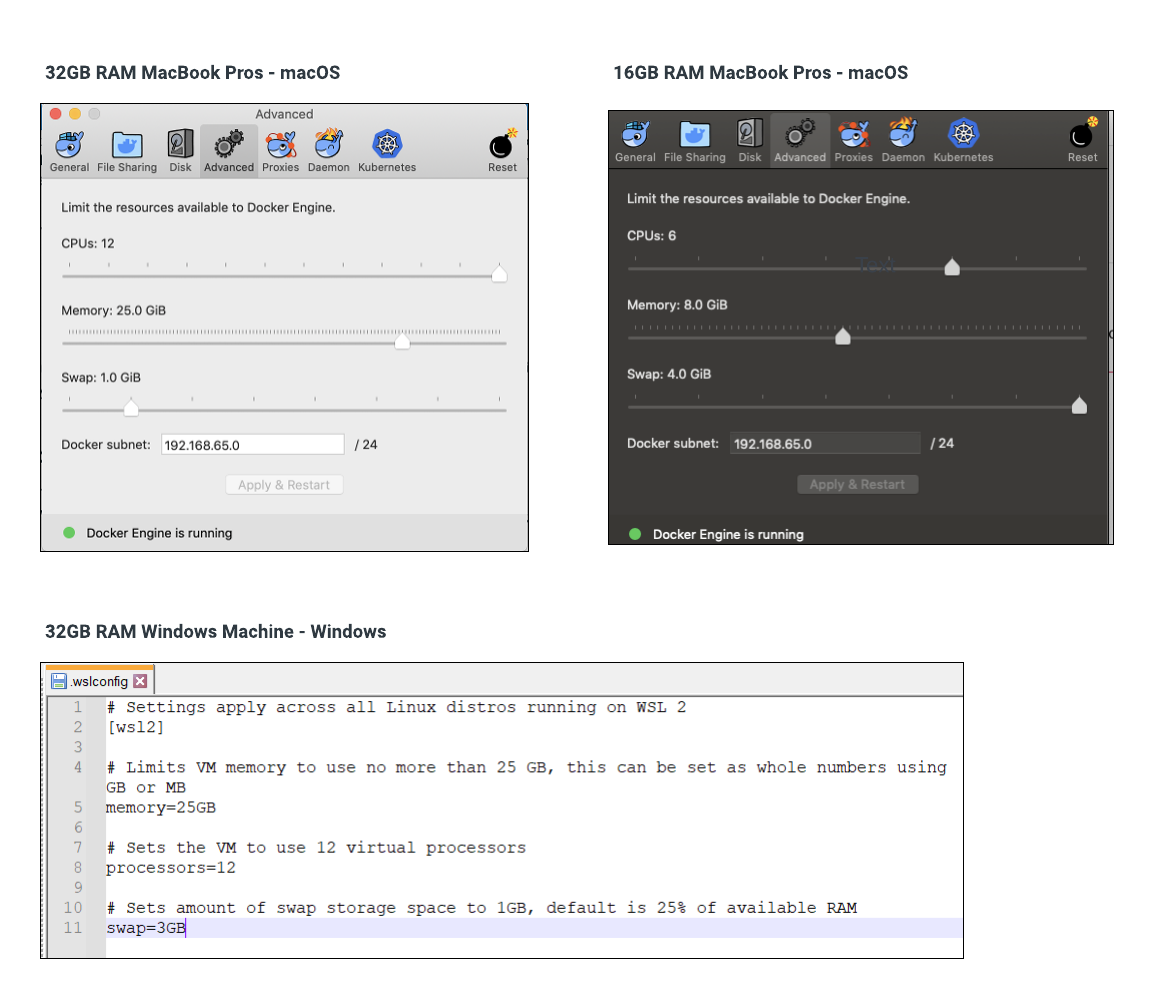
You’ll want to configure your container engine settings above the defaults. A good rule of thumb is to allow the container engine to consume around 3/4 of your system resources if necessary. Otherwise, your system may start shutting down some of your containers due to insufficient resources.
|
Tip
|
For certain Windows users running containers via WSL2, this may mean creating a .wslconfig file (example .wslconfig file) to appropriately control these resource usage settings.
|
The two sections below apply that rule of thumb to the recommended platforms.
OrbStack is macOS-only and behaves as a drop-in Docker Desktop replacement: it ships the Docker CLI, Compose, and buildx, creates a Docker context named orbstack that is used automatically from your terminal, and — if you grant it admin access — points the /var/run/docker.sock symlink at its own engine so third-party tools and IDE integrations keep working.
Requirements and installation:
macOS 14.0 or newer. Separate builds are published for Apple Silicon and Intel Macs.
Install via Homebrew, or download the app from orbstack.dev and open it — no installer to run.
brew install orbstackMigrating from Docker Desktop? OrbStack offers to migrate your existing containers, volumes, and images on first launch, or you can run orb docker migrate. It copies your data rather than moving it, so Docker Desktop is left intact until you choose to reset it.
Licensing: OrbStack is free for personal use; business and commercial use requires a paid per-user license after a 30-day grace period. See OrbStack’s FAQ for current terms.
Suggested settings for running the Broadleaf stack. These live under Settings in the OrbStack app menu, and each has a matching orb config key:
| Setting | Suggested Value | Why |
|---|---|---|
Memory Limit ( |
~3/4 of system memory (e.g. |
The single most important setting. OrbStack limits itself to no more than 8 GB by default, which is not enough for the full Broadleaf stack |
CPU Limit ( |
~3/4 of your cores (e.g. |
Applies the sizing rule of thumb above; the CLI expresses this as an integer multiple of 100% |
Rosetta ( |
Enabled |
Apple Silicon only. Runs |
Kubernetes |
Stopped — |
Broadleaf’s local flow runs on Docker Compose. A running cluster only consumes memory and CPU you want available to the services |
Container Direct Access ( |
Optional |
Lets you reach containers by IP address directly from macOS, which is handy when debugging a single service |
|
Note
|
Because OrbStack allocates resources on demand, these values are ceilings rather than reservations — memory is released back to macOS when containers are not using it. Setting a generous memory limit therefore costs you nothing while the stack is idle, which is why raising it well above the 8 GB default is safe. |
Verify your setup:
docker version
docker compose version
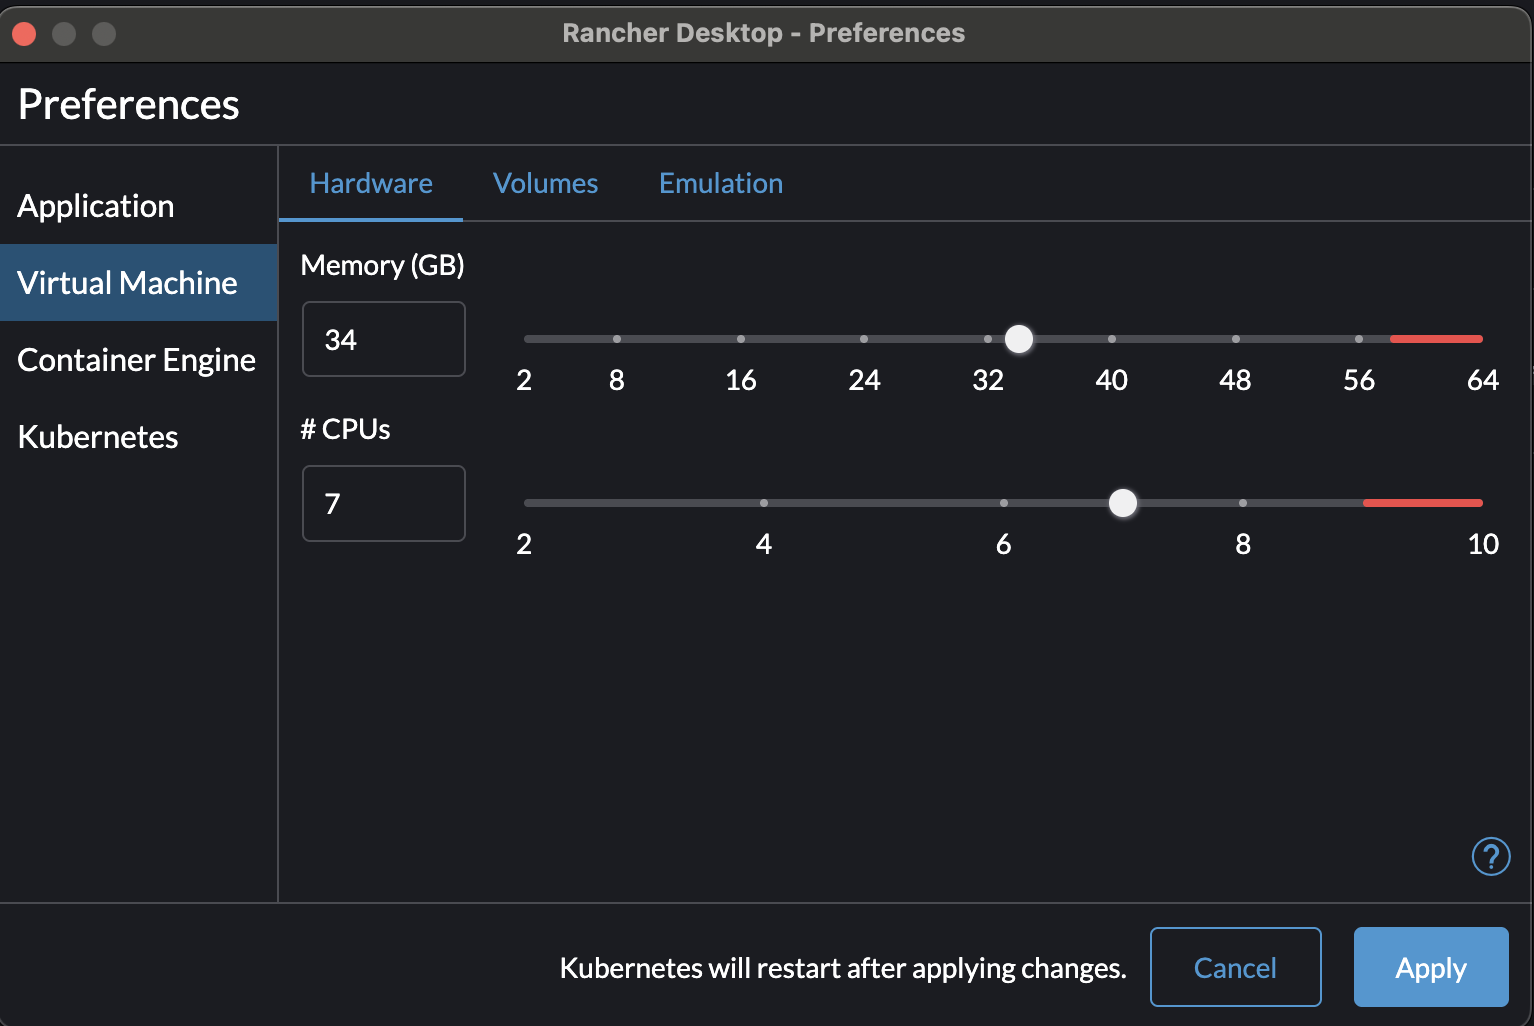
docker context lsBelow you will find suggested settings (i.e. the Preferences Dialog) for Rancher Desktop.
Note that some options may only be applicable for certain operating systems, and certain prerequisites may be additionally required (e.g. WSL2 is required for Windows). Please see the installation instructions specific to your OS on the Rancher Desktop installation page.
| Preferences Path | Value | Applies To |
|---|---|---|
Application → Allow to acquire administrative credentials (sudo access) |
|
Where applicable for your OS |
Virtual Machine → Hardware → Memory |
|
All |
Virtual Machine → Hardware → CPU |
|
All |
Virtual Machine → Volumes |
|
Where applicable for your OS |
Virtual Machine → Emulation → Virtual Machine Type |
|
All |
Virtual Machine → Emulation → VZ Options → Enable Rosetta Support |
|
MacOS only |
Container Engine |
|
All |
Kubernetes → Enable Traefik |
|
All |
OpenSSL is used to perform cryptographic operations during project generation and is responsible for several key security artifacts.
Certain systems already have openssl installed and available on your PATH. You can verify this by running the following on your command line. You should validate that the command is found and a valid version is installed (e.g. LibreSSL for MacOS or OpenSSL for Windows, etc…):
openssl versionIn the end, you should be able to execute this command and see similar results:
> openssl version
OpenSSL 3.1.4 24 Oct 2023 (Library: OpenSSL 3.1.4 24 Oct 2023)
We have primarily tested with versions >= 3.1.x, and your mileage may vary with earlier versions.
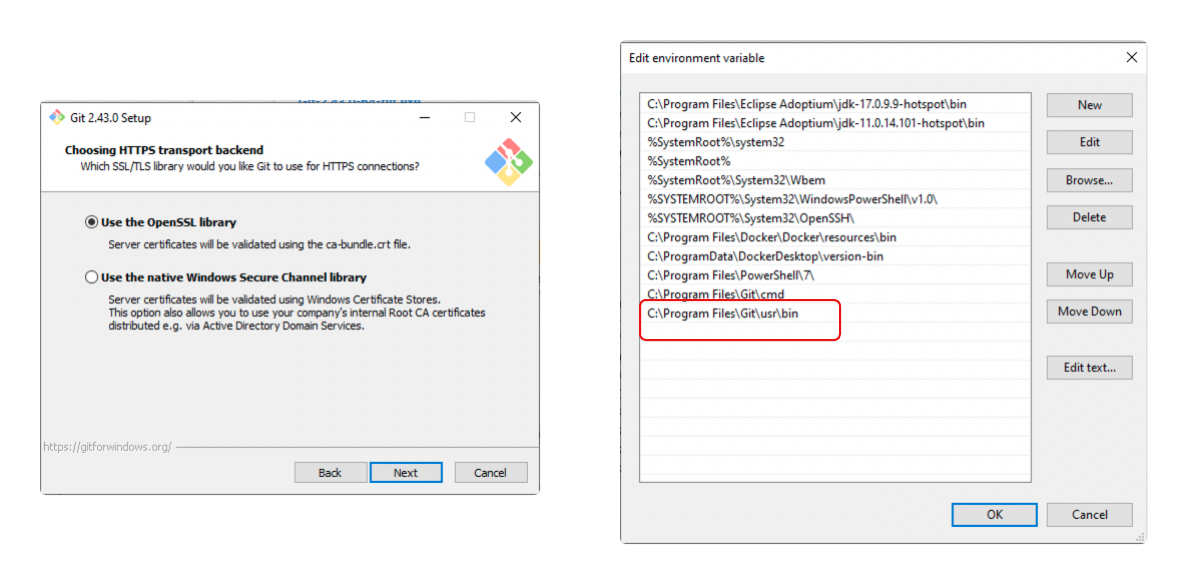
If the command is not found: one of the easiest ways to get OpenSSL installed is by including it during a git installation (Install Git). Otherwise, you may install OpenSSL directly using whatever method makes the most sense for your OS.
|
Note
|
You may need to add the directory containing the OpenSSL executable to your PATH.
|
|
Tip
|
If installing OpenSSL via Git on Windows, the installation process typically installs the executable in the following directory: C:\Program Files\Git\usr\bin\openssl.exe
|
Before you generate a project, it’s worth understanding what the generated project actually stands up. The following diagram illustrates the topology of all the resources and components that make up the full suite of Broadleaf Microservices once everything is deployed and running.
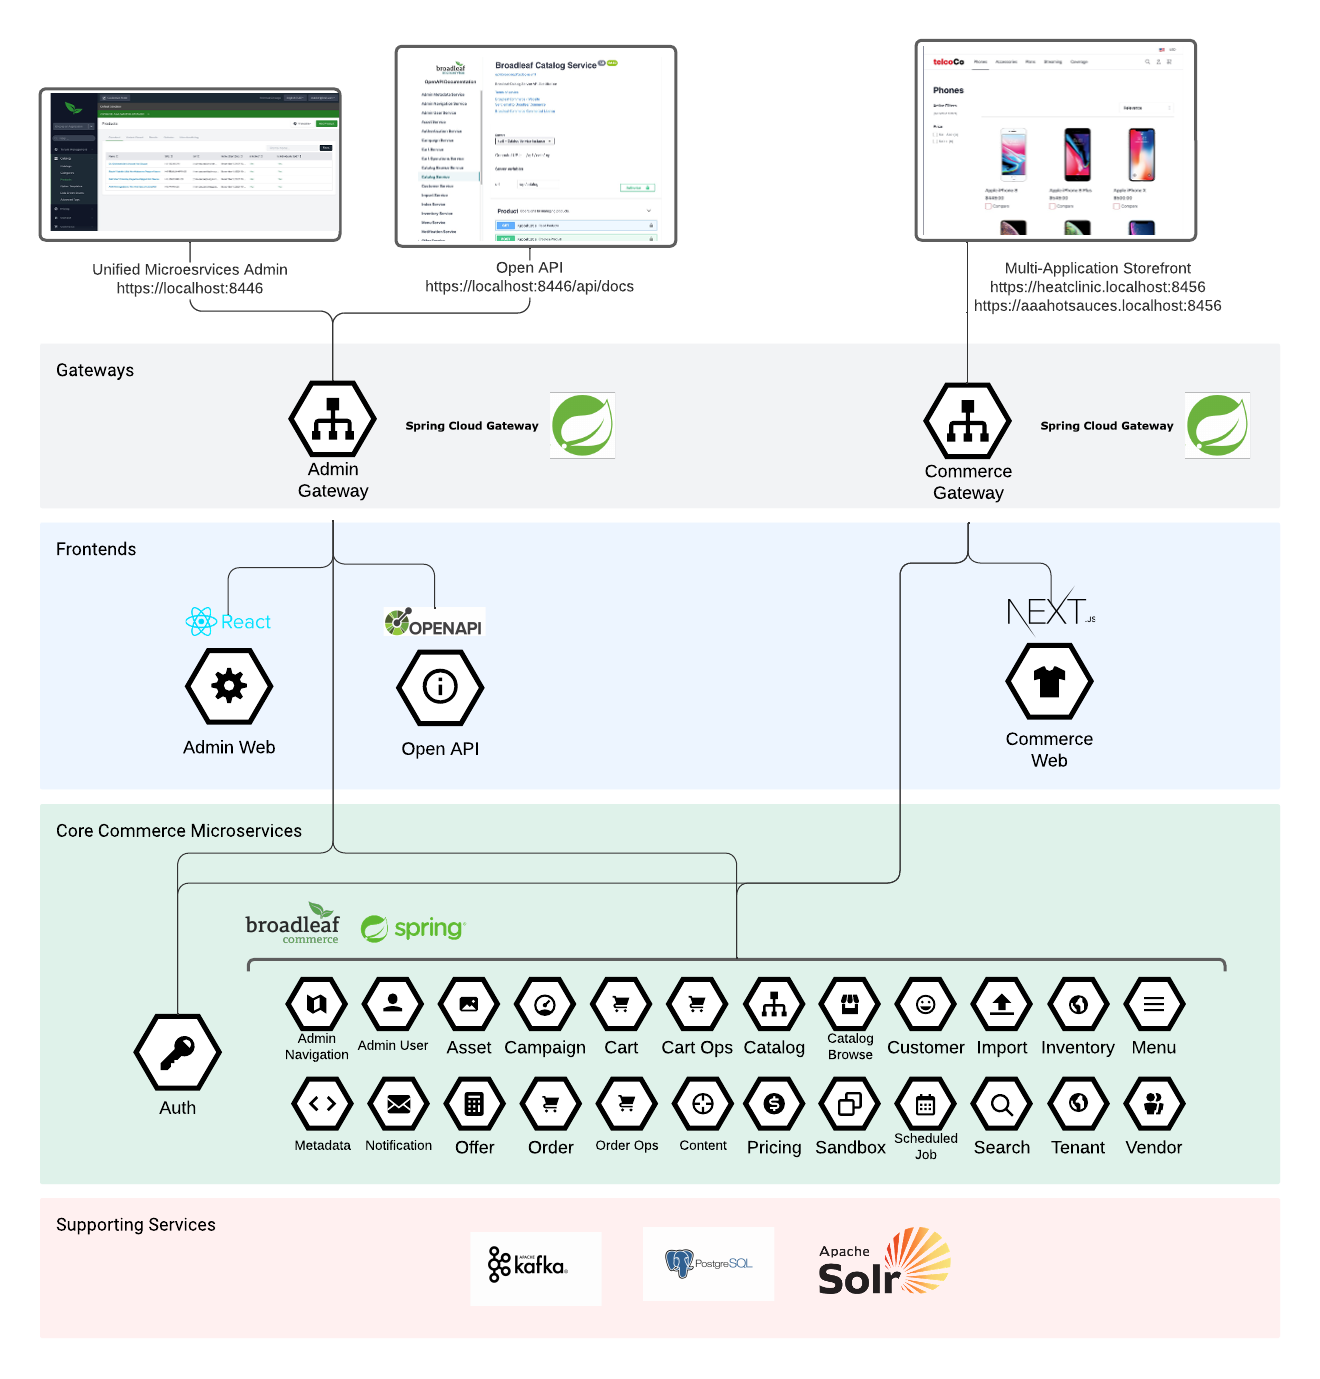
The overall topology can be broken down into a few functional tiers:
Gateways — the reference architecture provides two example proxy gateways: one for requests to back-office/internal applications and APIs called the admingateway, and another to route requests to a consumer experience/storefront frontend and related APIs called the commercegateway.
Frontend Applications — these are reference Node.js/React applications that provide interfaces to interact with the headless commerce APIs. These applications include a back-office admin console intended for merchandisers, content managers, vendors, CSRs, etc…; an Open API UI, which provides a useful interface for developers to understand how to use and consume the out-of-box commerce APIs; and finally an example storefront accelerator that is used to demonstrate how to create a best-practice consumer-facing storefront application.
Headless Commerce APIs — these represent the core Broadleaf microservices that provide a lot of commerce functionality across the different services. These core services can be bundled into different Flex Packages based on business needs and overall deployment intentions.
Supporting Services — Broadleaf is designed to support a variety of different supporting architecture components. The framework is built on top of different abstraction frameworks, allowing you to choose things like a relational database as well as a messaging broker. Our recommended defaults include Postgres and Kafka as an example.
Now that you have your machine set up, how do you get the microservices ecosystem running? The quickest way to get started is to generate a project using Broadleaf’s Project Initializr: start.broadleafcommerce.com.
|
Note
|
We recommend reading about some project changes and enhancements that have been introduced with the Broadleaf Initializr — especially if you have experience working with older versions of Broadleaf Microservices. |
Go to start.broadleafcommerce.com.
Pick the Broadleaf Release Train that you would like your project to target. If you are unsure or this is your first time evaluating Broadleaf, pick the latest stable version.
Choose a Flex Package Deployment Option. If this is your first time evaluating Broadleaf, we recommend choosing the Mono (also called the one) Flex Package option.
Configure a Group and Package Name specific to your company or implementation (e.g. com.mycompany.microservices).
Choose dependencies for your specific implementation. We recommend Postgres, Kafka, and the Config Server as good default starting points.
If you know what commerce microservices you wish to extend and customize, pick them here. If you are unsure or this is the first time evaluating Broadleaf, we recommend that you just skip this section, as you can easily modify your project later.
If you are just evaluating Broadleaf, we recommend checking the box that Enables Demo Data.
Click Generate to download a zip file to your local machine.
Unzip the downloaded file and review the HELP.md file included in the manifest project. Follow the instructions to generate, build, and run the suite of Broadleaf Microservices on your machine.
|
Tip
|
Once you have made your choices on the Initializr, you can also click "Explore" to preview the manifest project output before downloading anything. |
If you just want the shortest path to a running stack, use these:
| Initializr Option | Recommended Value | Why |
|---|---|---|
Release Train |
Latest |
Most recent tested combination of service versions |
Flex Package |
|
Fewest processes to run and monitor locally |
Dependencies |
|
The defaults these guides assume |
Microservices to customize |
None |
Can be added later; keeps the first build simple |
Demo Data |
Enabled |
Gives you a populated catalog, so the storefront and admin are immediately usable |
Follow the HELP.md in your generated manifest project — it is generated against the exact choices you made, so it is the authoritative build and run sequence for your project.
|
Important
|
Evaluation Credential Holders: several commands in |
Related setup references:
Docker Configuration — container-level configuration details
IntelliJ Setup — running and debugging the services from your IDE
Integrated Local Development Guide — running a frontend against your local backend
Forums: forums.broadleafcommerce.com — known issues, workarounds, and questions from other developers
Documentation search: use the search on this portal; most setup issues are covered in the starter-project guides linked above
Talk to us: contact us for licensing questions, evaluation credentials, or help scoping an implementation
There are multiple ways to experience working with the framework.
Below you will find links to core framework concepts that are important to be familiar with. Using these core concepts, you can support a variety of different business models, use cases, and industry verticals.
Resources that outline and describe important Broadleaf concepts and features:
Resources catered to frontend developers and to those looking to create a consumer-facing storefront experience:
|
Note
|
Installing the @broadleaf/* packages these guides reference requires access to Broadleaf’s private NPM Repository, which is available to Enterprise License Holders only. Developer evaluation credentials do not include NPM access — the frontend applications still run locally as container images, they just cannot be built from source. Contact us if your evaluation needs frontend package access.
|
As a backend developer, here are a few resources catered to debugging and customizing the core Spring/Java commerce APIs: