- v1.0.0-latest-prod
Deprecation Notice: these instructions are applicable to older MicroservicesDemo-based project structures not generated using Broadleaf Initializr and Manifest. We recommend starting new projects using Broadleaf Initializr for new installations. New DevOps Tutorials for Initializr-based projects can be found here.
The following tutorial will walk through the steps necessary to deploy the Microservices Starter Projects to an empty Kubernetes Cluster on your cloud of choice.
|
Important
|
The following requires credentials and access to the Microservice Starter Projects outlined in the guide: Getting Started Locally. |
In this tutorial you will need:
An empty Kubernetes cluster on your cloud of choice
An already provisioned cloud Postgresql instance
docker installed locally
kubectl installed locally
helm installed locally
devops-helm-charts project containing example umbrella charts provided as part of the starter projects.
as of 1.7, we have begun publishing common base charts to a private helm repository. In order to pull in and use these charts, you will need to authenticate (i.e. helm repo add broadleaf https://repository.broadleafcommerce.com/repository/helm-private/ --username $BLC_REGISTRY_USER --password $BLC_REGISTRY_PASSWORD) using the same credentials that were sent to you (these are the same credentials that allow you to build and run the microservice applications). Follow the README instructions in the provideddevops-helm-chartsrepo for more details.
The starter project and demo data assumes a static and pre-defined domain name that supports subdomains. Be sure to have one ready or in mind before you start this guide.
For this tutorial we will use:
https://admin.mydomain-test.com - for the back-office unified microservices admin
https://heatclinic.mydomain-test.com - for one of the demo customer storefront
https://aaahotsauces.mydomain-test.com - for another demo customer storefront
At the end of this we will create a wildcard ssl cert for *.mydomain-test.com to support this as well.
|
Note
|
It’s preferable that you have the ability to control the DNS and can add a CNAME or A record to point to an accessible ingress, however if that is not possible, you can change your /etc/hosts file for individual local testing if necessary. |
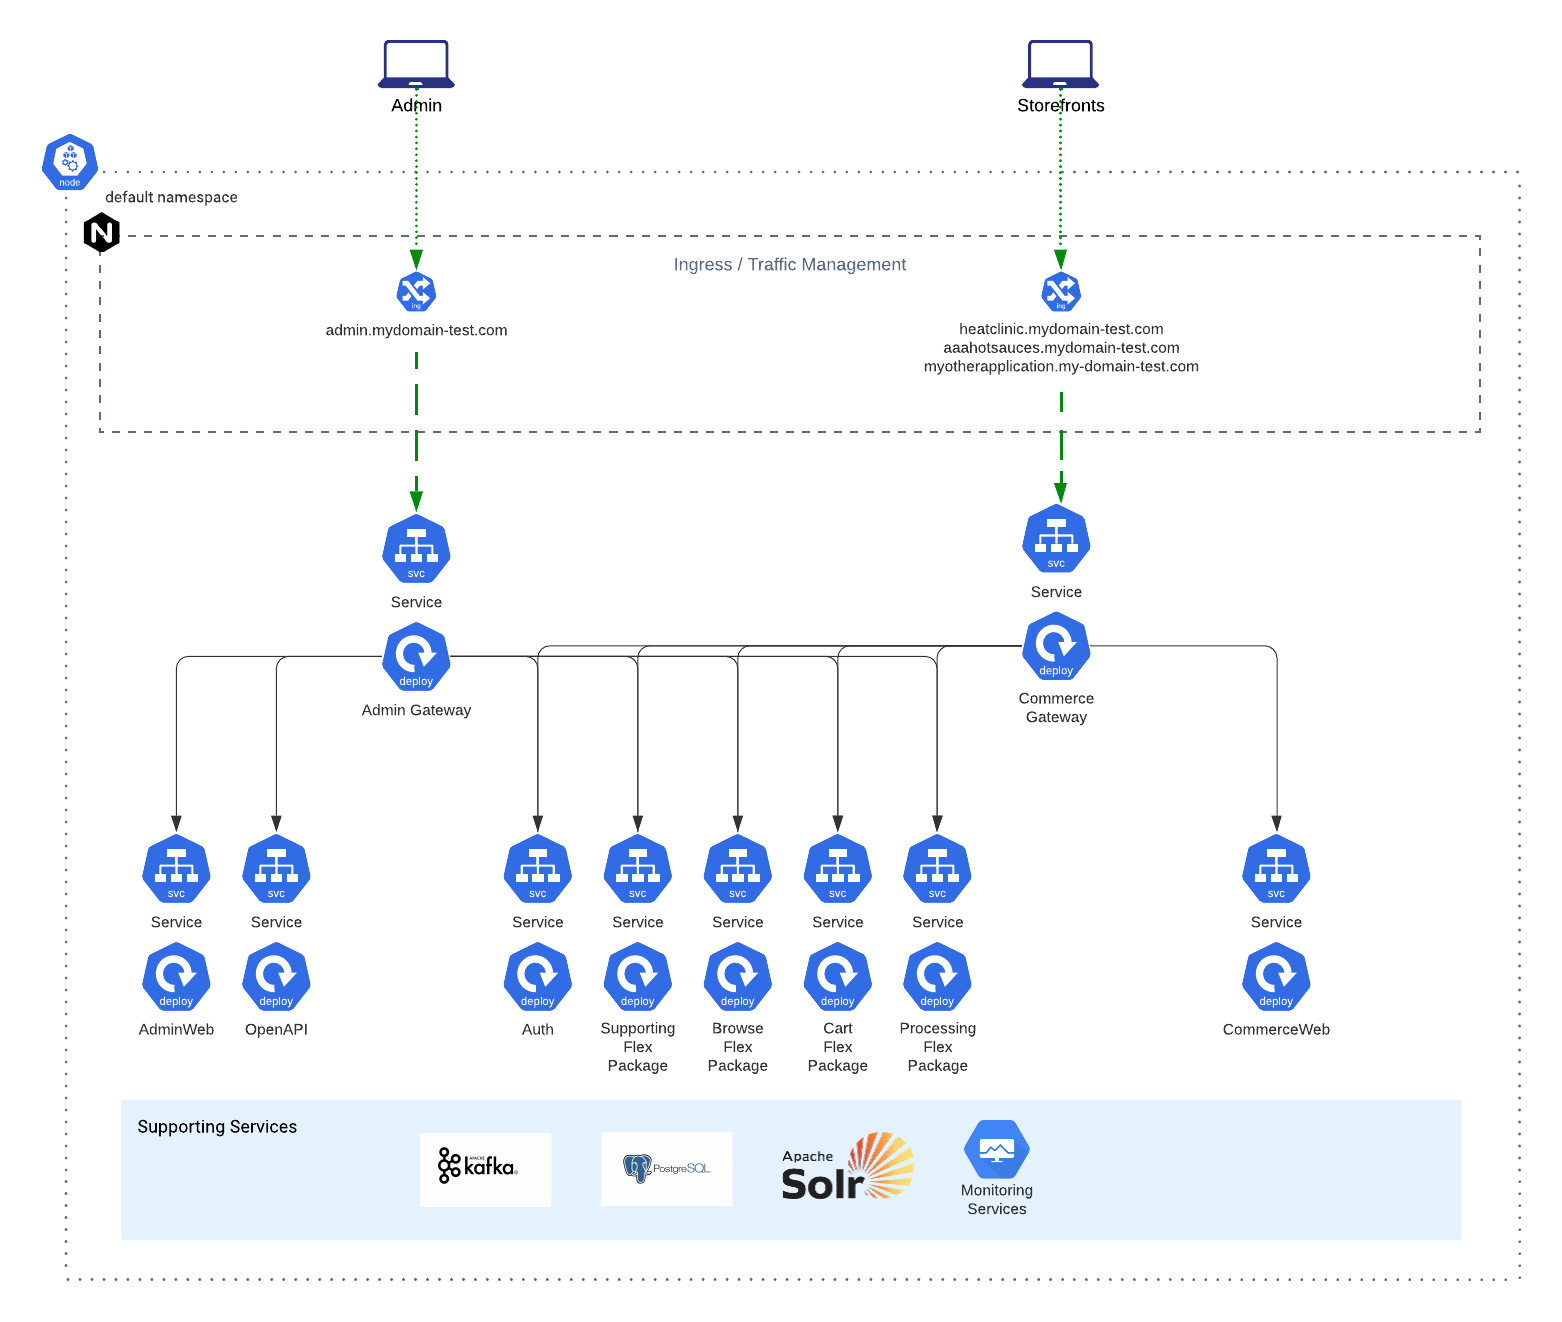
Because we recommend that most enterprises start by deploying the Balanced Flex Package, our instructions and most of the examples you will see on this developer portal will be catered to deploying the Balanced Flex Package composition by default.
If you’re unfamiliar with the topology of the Balanced Flex Package, we recommend reviewing this High Level Diagram describing the how the starter accelerator projects are composed as well as reviewing this example topology map:
Included in the starter projects is a repository that contains example Umbrella helm charts + an opinionated installation script that showcases the deployment of the full Broadleaf Microservices stack (including all necessary supporting services) onto an empty K8 cluster.
We highly recommend you use the provided ./install.sh script (at least as a starting point) when first attempting to deploy the stack to your own cloud.
There is an inherent order of operations and timing that is inferred with the way the installation script runs - particularly related to how the seed and demo data is first initialized in order to work properly. We also highly encourage the use of the ./uninstall.shto completely tear down resources as you begin to experiment incorporating these resources into your environment.
In the backend flex package starter project, you will notice some example spring environment property files (e.g. flexpackages/balanced/browse/src/main/resources/application-qa.yml)
This allows us to pass in ENV properties like: SPRING_PROFILES_ACTIVE: default,qa,monitored to our deployment in order to resolve environment specific properties.
For the purposes of this tutorial, we’re going to assume that you will be deploying to an environment named qa. You can also create your own environment profile instead if you wish (e.g. application-dev.yaml etc…)
|
Tip
|
search the project for all application-qa.yaml files so that you can update all references at once.
|
Within these files, you’ll notice some key properties defined.
You will need to override these specific properties in particular:
BROADLEAF_TENANT_URLRESOLVER_APPLICATION_DOMAIN
BROADLEAF_TENANT_URLRESOLVER_ADMIN_DOMAIN
broadleaf:
  tenant:
    liquibase:
      change-log: 'classpath:/db/changelog/qa.tenant.flexdemo.postgresql.changelog-master.yaml'
    urlresolver:
      application:
        port: 443
        domain: qa.com  (e.g. change to mydomain-test.com)
      admin:
        port: 443
domain: admin.qa.com (e.g. change to admin.mydomain-test.com)|
Tip
|
you can either specify these in the application-<your environment>.yaml file explicitly or pass them in as ENV variables to the container.
|
Next, notice that the tenant changelog has been overriden to: classpath:/db/changelog/qa.tenant.flexdemo.postgresql.changelog-master.yaml which is defined in the Tenant service here: services/tenant/src/main/resources/db/changelog/qa.tenant.flexdemo.postgresql.changelog-master.yaml
If you open that changelog, you should notice that it is referencing a SQL update file: services/tenant/src/main/resources/sql/qa-tenant-data-jpa.sql
You’ll want to update this SQL to reflect your chosen domain.
UPDATE BLC_TENANT SET TENANT_NAME = 'BLC QA Tenant', IDENTIFIER_VALUE = '<change to your application base domain e.g. mydomain-test.com>' WHERE ID = '5DF1363059675161A85F576D';
UPDATE BLC_TENANT_APPLICATION SET IDENTIFIER_TYPE = 'DOMAIN_PREFIX', IDENTIFIER_VALUE = 'aaahotsauces' WHERE ID = '1';
UPDATE BLC_TENANT_APPLICATION SET IDENTIFIER_TYPE = 'DOMAIN_PREFIX', IDENTIFIER_VALUE = 'heatclinic' WHERE ID = '2';
UPDATE BLC_TENANT_APPLICATION SET IDENTIFIER_TYPE = 'DOMAIN_PREFIX', IDENTIFIER_VALUE = 'allthesauce' WHERE ID = '3';
UPDATE BLC_TENANT_APPLICATION SET IDENTIFIER_TYPE = 'DOMAIN_PREFIX', IDENTIFIER_VALUE = 'demo' WHERE ID = 'DEMO_APP';|
Tip
|
For testing purposes: If you don’t want to rebuild the docker images to change the SQL files and just use the default demo docker images provided by Broadleaf, you will need to go into the database and update these records manually to use your correct domain name after everything has been deployed. Note that you will still need to pass BROADLEAF_TENANT_URLRESOLVER_APPLICATION_DOMAIN and BROADLEAF_TENANT_URLRESOLVER_ADMIN_DOMAIN with the proper values as ENV properties to the container (shown in the helm section below)
|
Finally, you’ll want to rebuild the backend APIs to produce your own docker images via a CI/CD worfklow, or you can just locally package and tag them. Either way, you’ll want to push these docker images into your own docker registry for a Kubernetes deployment.
To build your own docker images locally, you can run the following in the root of the backend flex package starter project:
./mvnw clean install
./mvnw clean package -Pdocker -DbuildLocalDockerOnly=true|
Note
|
The buildLocalDockerOnly property will ensure the image is created matching your local machine’s architecture.
See the Maven docker profile configuration in the project pom for more information.
|
You should see the maven build produce logs for the Docker build steps.
|
Tip
|
You can change the tag names and version by updating the pom.xml config for the docker profile in your project. Once this has finished building, you can verify all the flex packages have produced local docker images using the following command: docker images
|
Finally - you’ll want to tag each of these and push them to your own container registry. e.g.
docker tag <image_id> my.cloud.registry.com/broadleaf-demo/demo-browse-flex-application:latest

docker push my.cloud.registry.com/broadleaf-demo/demo-browse-flex-application:latest

...Now that you have all your images ready and pushed to your container registry, let’s prep our K8 helm charts to reference the appropriate configuration.
The next few sections assumes that you already have an existing empty Kubernetes cluster ready to go as well as a cloud PostgresSQL instance provisioned. Please see the included Terraform Starter Project for more details on how to provision these resources on your cloud.
|
Important
|
Make sure you’re in the right kubectl context before proceeding with the rest of this guide. You can verify this by running kubectl config current-context
|
The Starter Helm Charts project provides a useful install script that supports deploying multiple example flex package configurations to a cloud environment. This includes the ability to specify an environment specific configuration file that can override the default helm chart values and can be taken into account when installing to that environment. To do this, you can pass in the -e flag with a reference to a particular environment convention defined in a blc-environments folder.
For Example:
Helm Charts/
├── blc-balanced-flex-demo
├── blc-environments (create this folder and files with environment overrides)
|   ├── <environment>
|   |   ├── auth-<environment>.yaml (follow naming convention)
|   |   ├── blc-balanced-flex-demo-<environment>.yaml (follow naming convention)
|   |   ├── blc-supporting-stack-<environment>.yaml (follow naming convention)
|   |   └── blc-web-stack-<environment>.yaml (follow naming convention)
|   ├── qa
|   |   ├── auth-qa.yaml
|   |   ├── blc-balanced-flex-demo-qa.yaml
|   |   ├── blc-supporting-stack-qa.yaml
|   |   └── blc-web-stack-qa.yaml
├   ├── staging
├   ├── production
├   └── ...
├── blc-supporting-stack
└── ...In this tutorial, we’re going to assume we’ll be deploying the Balanced Flex Package configuration. With this composition, we’ll want to create the following override files:
/blc-environments/qa/auth-qa.yaml
/blc-environments/qa/blc-balanced-flex-demo-qa.yaml
/blc-environments/qa/blc-supporting-stack-qa.yaml
/blc-environments/qa/blc-web-stack-qa.yaml
starting with 1.7+ we have provided some additional "override" examples that you can look at for reference under the blc-environments/cloudexamplefolder that defines common override properties you would typically want to set.
The example override values that we provide in this tutorial aim to illustrate deployment of the full stack to a "QA environment" (which for this example will be deployed to mydomain-test.com) while inheriting all the rest of the properties from the provided umbrella helm charts provided in the project.
auth helm chartTypical override configuration you will want to include:
The appropriate image repository (e.g. your image located in your own private container registry)
A reference to a Kubernetes Secret that contains credentials to your private container registry
The appropriate active Spring Profile configuration
The appropriate Postgres Datasource URL
"Auth Data Load Admin and Application Host" to use your domain
Additional Auth Server creation domain "templates" (so you can dynamically provision new applications under the same domain through the admin)
# auth-qa.yaml
image:
  repository: my.cloud.registry.com/my-blc-auth-image
  tag: "latest"
imagePullSecrets:
  - name: my-registry-creds
env:
  SPRING_PROFILES_ACTIVE: default,cors,monitored
  SPRING_DATASOURCE_URL: jdbc:postgresql://my.cloud.postgres:5432/broadleaf?currentSchema=auth
  SPRING_DATASOURCE_USERNAME:
    name: cloudsql-db-credentials
    key: username
  SPRING_DATASOURCE_PASSWORD:
    name: cloudsql-db-credentials
    key: password
  BROADLEAF_AUTH_DATA_LOAD_BASEADMINHOST: admin.mydomain-test.com
  BROADLEAF_AUTH_DATA_LOAD_BASEAPPLICATIONHOST: mydomain-test.com
  BROADLEAF_STARTUP_DEPENDENCY_CHECK_SERVICES: zookeeper,kafkacluster,solr-exporter
extraEnvs:
  - name: BROADLEAF_AUTH_SERVERCREATIONDEFAULTS_DEFAULT_DOMAINDEFAULTREDIRECTURIS_0
    value: 'https://{domain}.mydomain-test.com/callback'
  - name: BROADLEAF_AUTH_SERVERCREATIONDEFAULTS_DEFAULT_DOMAINDEFAULTREDIRECTURIS_1
    value: 'https://{domain}.mydomain-test.com/silent-callback.html'
  - name: BROADLEAF_AUTH_SERVERCREATIONDEFAULTS_DEFAULT_DOMAINDEFAULTREDIRECTURIS_2
    value: 'https://{domain}.mydomain-test.com.com'
  - name: BROADLEAF_AUTH_SERVERCREATIONDEFAULTS_DEFAULT_DOMAINDEFAULTREDIRECTURIS_3
    value: 'https://www.{domain}.mydomain-test.com/callback'
  - name: BROADLEAF_AUTH_SERVERCREATIONDEFAULTS_DEFAULT_DOMAINDEFAULTREDIRECTURIS_4
    value: 'https://www.{domain}.mydomain-test.com/silent-callback.html'
  - name: BROADLEAF_AUTH_SERVERCREATIONDEFAULTS_DEFAULT_DOMAINDEFAULTREDIRECTURIS_5
    value: 'https://www.{domain}.mydomain-test.com'
  - name: BROADLEAF_AUTH_SERVERCREATIONDEFAULTS_DEFAULT_DOMAINDEFAULTCLIENTREDIRECTURI
    value: 'https://{domain}.mydomain-test.com'
  - name: BROADLEAF_AUTH_SERVERCREATIONDEFAULTS_DEFAULT_DOMAINPREFIXDEFAULTREDIRECTURIS_0
    value: 'https://{domain}.mydomain-test.com/callback'
  - name: BROADLEAF_AUTH_SERVERCREATIONDEFAULTS_DEFAULT_DOMAINPREFIXDEFAULTREDIRECTURIS_1
    value: 'https://{domain}.mydomain-test.com/silent-callback.html'
  - name: BROADLEAF_AUTH_SERVERCREATIONDEFAULTS_DEFAULT_DOMAINPREFIXDEFAULTREDIRECTURIS_2
    value: 'https://{domain}.mydomain-test.com'
  - name: BROADLEAF_AUTH_SERVERCREATIONDEFAULTS_DEFAULT_DOMAINPREFIXDEFAULTCLIENTREDIRECTURI
    value: 'https://{domain}.mydomain-test.com'
  - name: BROADLEAF_MESSAGING_CLUSTERSERVICEIMPLEMENTATIONTYPE
    value: kubernetes
  - name: BROADLEAF_MESSAGING_CLUSTERK8SAPPLABELVALUE
    value: auth
  - name: LOGGING_LEVEL_ORG_APACHE_CAMEL_COMPONENT_KUBERNETES_CLUSTER_LOCK
value: WARNblc-balanced-flex-demo Umbrella ChartTypical override configuration you will want to include:
The appropriate image repository (e.g. your image located in your own private container registry)
A reference to a Kubernetes Secret that contains credentials to your private container registry
The appropriate active Spring Profile configuration
The appropriate Postgres Datasource URL
Any overrides to the fully qualified location of the Zookeeper and Kafka pods (if you decided to deploy those pods to a different namespace)
Any overrides to support your domain for the Asset Provider
the appropriate tenant and admin url resolver properties for the Supporting flex package
flex-balanced-browse:
  enabled: true
  image:
    repository: my.cloud.registry.com/my-blc-browse-flex-application
    tag: "latest"
  imagePullSecrets:
    - name: my-registry-creds
  persistence:
    accessModes:
      - ReadWriteMany
    storageClassName: "nfs"
  env:
    SPRING_PROFILES_ACTIVE: default,monitored
    BROADLEAF_COMPOSITE_DATASOURCE_URL: jdbc:postgresql://my.cloud.postgres:5432/broadleaf
    BROADLEAF_COMPOSITE_DATASOURCE_USERNAME:
      name: cloudsql-db-credentials
      key: username
    BROADLEAF_COMPOSITE_DATASOURCE_PASSWORD:
      name: cloudsql-db-credentials
      key: password
    BROADLEAF_ASSET_PROVIDER_CONTENTURLPREFIX: https://admin.mydomain-test.com/api/asset/content
    BROADLEAF_ASSET_INTERNAL_CONTENT_PROVIDER_URL_PREFIX: https://admin.mydomain-test.com/api/asset
  extraEnvs:
    - name: BROADLEAF_MESSAGING_CLUSTERK8SAPPLABELVALUE
      value: browse

flex-balanced-cart:
  enabled: true
  image:
    repository: my.cloud.registry.com/my-blc-cart-flex-application
    tag: "latest"
  imagePullSecrets:
    - name: my-registry-creds
  env:
    SPRING_PROFILES_ACTIVE: default,monitored
    BROADLEAF_COMPOSITE_DATASOURCE_URL: jdbc:postgresql://my.cloud.postgres:5432/broadleaf
    BROADLEAF_COMPOSITE_DATASOURCE_USERNAME:
      name: cloudsql-db-credentials
      key: username
    BROADLEAF_COMPOSITE_DATASOURCE_PASSWORD:
      name: cloudsql-db-credentials
      key: password
  extraEnvs:
    - name: BROADLEAF_MESSAGING_CLUSTERK8SAPPLABELVALUE
      value: cart

flex-balanced-common-env:
  enabled: true
  data:
    SPRING_CLOUD_STREAM_KAFKA_BINDER_BROKERS: 'kafkacluster-0.kafkacluster-headless.default.svc.cluster.local:9092,kafkacluster-1.kafkacluster-headless.default.svc.cluster.local:9092,kafkacluster-2.kafkacluster-headless.default.svc.cluster.local:9092'
    SPRING_CLOUD_STREAM_KAFKA_BINDER_ZKNODES: 'zookeeper-0.zookeeper-headless.default.svc.cluster.local:2181,zookeeper-1.zookeeper-headless.default.svc.cluster.local:2181,zookeeper-2.zookeeper-headless.default.svc.cluster.local:2181'
    BROADLEAF_MONITORING_TIMEFRAME_GRAFANA_HOSTURI: https://grafana.mydomain-test.com
    BROADLEAF_MESSAGING_CLUSTERSERVICEIMPLEMENTATIONTYPE: kubernetes
    LOGGING_LEVEL_ORG_APACHE_CAMEL_COMPONENT_KUBERNETES_CLUSTER_LOCK: WARN

flex-balanced-processing:
  enabled: true
  image:
    repository: my.cloud.registry.com/my-blc-processing-flex-application
    tag: "latest"
  imagePullSecrets:
    - name: my-registry-creds
  env:
    SPRING_PROFILES_ACTIVE: default,monitored
    BROADLEAF_COMPOSITE_DATASOURCE_URL: jdbc:postgresql://my.cloud.postgres:5432/broadleaf
    BROADLEAF_COMPOSITE_DATASOURCE_USERNAME:
      name: cloudsql-db-credentials
      key: username
    BROADLEAF_COMPOSITE_DATASOURCE_PASSWORD:
      name: cloudsql-db-credentials
      key: password
    BROADLEAF_ASSET_PROVIDER_CONTENTURLPREFIX: https://admin.mydomain-test.com/api/asset/content
    BROADLEAF_SEARCH_SOLR_SERVER_HOST: zookeeper-0.zookeeper-headless.default.svc.cluster.local:2181,zookeeper-1.zookeeper-headless.default.svc.cluster.local:2181,zookeeper-2.zookeeper-headless.default.svc.cluster.local:2181
  extraEnvs:
    - name: BROADLEAF_MESSAGING_CLUSTERK8SAPPLABELVALUE
      value: processing

flex-balanced-routes-env:
  enabled: true

flex-balanced-supporting:
  enabled: true
  image:
    repository: my.cloud.registry.com/broadleaf-demo/demo-supporting-flex-application
    tag: "latest"
  imagePullSecrets:
    - name: my-registry-creds
  env:
    SPRING_PROFILES_ACTIVE: default,qa,monitored
    BROADLEAF_TENANT_LIQUIBASE_CHANGELOG: 'classpath:/db/changelog/qa.tenant.flexdemo.postgresql.changelog-master.yaml'
    BROADLEAF_COMPOSITE_DATASOURCE_URL: jdbc:postgresql://my.cloud.postgres:5432/broadleaf
    BROADLEAF_COMPOSITE_DATASOURCE_USERNAME:
      name: cloudsql-db-credentials
      key: username
    BROADLEAF_COMPOSITE_DATASOURCE_PASSWORD:
      name: cloudsql-db-credentials
      key: password
    BROADLEAF_TENANT_URLRESOLVER_APPLICATION_SCHEME: https
    BROADLEAF_TENANT_URLRESOLVER_APPLICATION_DOMAIN: mydomain-test.com
    BROADLEAF_TENANT_URLRESOLVER_APPLICATION_PORT: 443
    BROADLEAF_TENANT_URLRESOLVER_ADMIN_SCHEME: https
    BROADLEAF_TENANT_URLRESOLVER_ADMIN_DOMAIN: admin.mydomain-test.com
    BROADLEAF_TENANT_URLRESOLVER_ADMIN_PORT: 443
    BROADLEAF_ASSET_PROVIDER_CONTENTURLPREFIX: https://admin.mydomain-test.com/api/asset/content/
    BROADLEAF_SEARCH_SOLR_SERVER_HOST: zookeeper-0.zookeeper-headless.default.svc.cluster.local:2181,zookeeper-1.zookeeper-headless.default.svc.cluster.local:2181,zookeeper-2.zookeeper-headless.default.svc.cluster.local:2181
  extraEnvs:
    - name: BROADLEAF_MESSAGING_CLUSTERK8SAPPLABELVALUE
      value: supporting

job-solr-create-collections:
  enabled: true
  ZK_HOST: zookeeper-0.zookeeper-headless.default.svc.cluster.local:2181,zookeeper-1.zookeeper-headless.default.svc.cluster.local:2181,zookeeper-2.zookeeper-headless.default.svc.cluster.local:2181
SOLR_HOST: solr-0.solr-headless.default.svc.cluster.local:8983blc-supporting-stack Umbrella ChartTypical override configuration you will want to include are:
The appropriate image repository (e.g. your image located in your own private container registry)
A reference to a Kubernetes Secret that contains credentials to your private container registry
Any overrides to the fully qualified location of the Zookeeper and Kafka pods (if you decided to deploy those pods to a different namespace)
kafka:
  enabled: true
  env:
    KAFKA_ZOOKEEPER_CONNECT: zookeeper-0.zookeeper-headless.default.svc.cluster.local:2181,zookeeper-1.zookeeper-headless.default.svc.cluster.local:2181,zookeeper-2.zookeeper-headless.default.svc.cluster.local:2181/broadleaf/kafka

openapi-ui:
  enabled: true
  fullRollout:
    enabled: true

solr:
  enabled: true
  env:
    SPRING_CLOUD_STREAM_KAFKA_BINDER_BROKERS: kafkacluster-0.kafkacluster-headless.default.svc.cluster.local:9092,kafkacluster-1.kafkacluster-headless.default.svc.cluster.local:9092,kafkacluster-2.kafkacluster-headless.default.svc.cluster.local:9092
    SPRING_CLOUD_STREAM_KAFKA_BINDER_ZKNODES: zookeeper-0.zookeeper-headless.default.svc.cluster.local:2181,zookeeper-1.zookeeper-headless.default.svc.cluster.local:2181,zookeeper-2.zookeeper-headless.default.svc.cluster.local:2181
    ZK_HOST: zookeeper-0.zookeeper-headless.default.svc.cluster.local:2181,zookeeper-1.zookeeper-headless.default.svc.cluster.local:2181,zookeeper-2.zookeeper-headless.default.svc.cluster.local:2181

zookeeper:
  enabled: true
  zkServers: zookeeper-0.zookeeper-headless.default.svc.cluster.local:2888:3888;zookeeper-1.zookeeper-headless.default.svc.cluster.local:2888:3888;zookeeper-2.zookeeper-headless.default.svc.cluster.local:2888:3888

job-zk-upconfig:
  enabled: true
  ZK_HOST: zookeeper-0.zookeeper-headless.default.svc.cluster.local:2181,zookeeper-1.zookeeper-headless.default.svc.cluster.local:2181,zookeeper-2.zookeeper-headless.default.svc.cluster.local:2181
SOLR_HOST: solr-0.solr-headless.default.svc.cluster.local:8983blc-web-stack Umbrella ChartTypical override configuration you will want to include are:
The appropriate image repository (e.g. your image located in your own private container registry)
A reference to a Kubernetes Secret that contains credentials to your private container registry
The appropriate active Spring Profile configuration
The appropriate Postgres Datasource URL
typically disabling SSL since we typically recommend terminating SSL at the Ingress which will point to the gateways
make sure commerceweb points to the fully qualified internal commercegateway url (in the case that you overrode the default namespace)
admingateway:
  enabled: true
  image:
    repository: my.cloud.registry.com/broadleaf/admingateway-monitored
    tag: "latest"
  imagePullSecrets:
    - name: my-registry-creds
  fullRollout:
    enabled: true
  service:
    type: ClusterIP
    port: 8446
    nodePort: ''
  env:
    SERVER_SSL_ENABLED: false

adminweb:
  enabled: true
  image:
    repository: my.cloud.registry.com/broadleaf/adminweb
    tag: "latest"
  imagePullSecrets:
    - name: my-registry-creds

commercegateway:
  enabled: true
  image:
    repository: my.cloud.registry.com/broadleaf/commercegateway-monitored
    tag: "latest"
  imagePullSecrets:
    - name: my-registry-creds
  service:
    type: ClusterIP
    port: 8456
    nodePort: ''
  env:
    SERVER_SSL_ENABLED: false
    SPRING_PROFILES_ACTIVE: default,cors,monitored

commerceweb:
  enabled: true
  image:
    repository: my.cloud.registry.com/broadleaf/commerce-nextjs-starter
    tag: "latest"
  imagePullSecrets:
    - name: my-registry-creds
  env:
    NEXT_PUBLIC_GATEWAY_HOST: "http://commercegateway.default.svc.cluster.local:8456"
    NEXT_PUBLIC_API_ORIGIN: "http://commercegateway.default.svc.cluster.local:8456"
  extraEnvs:
    - name: NODE_TLS_REJECT_UNAUTHORIZED
value: "0"Always Roll Deployments
With each of ther services, you have the ability to define the property fullRollout.enabled which will support always rolling your deployment, even if you manifest has not changed. It will enable the rollme annotation strategy as defined here: https://helm.sh/docs/howto/charts_tips_and_tricks/#automatically-roll-deployments. This supports testing scenarios where you may be producing non-versioned docker tags (i.e latest) and wanting the cluster to always pull the latest even though the configuration has not changed.
Default Namespace
Many of the base configurations defined in the helm charts assume use of the default kubernetes namespace. If you’re deploying these to a different namespace, you’ll want to make sure and update or override all "connection references" that assume the "default" namespace.
Before we deploy the Microservices Stack, you’ll first need to create a Kubernetes Secret that contains the credentials to your own private container registry (so that the pods can pull your images).
kubectl create secret docker-registry my-registry-creds \
  --docker-server=my.cloud.registry.com \
  --docker-username=<My Registry Username> \
  --docker-password=<My Registry Password> \
  --docker-email=<My Registry Email>
Now that’s in place, you can install the full stack using the following command:
using qa configuration
in a balanced flex package composition
with specific Cloud SQL DB connection information
enabling test nfs provisioner
|
Important
|
Make sure you’re in the right kubectl context before running this installation command. You can verify this by running kubectl config current-context
|
BLC_REGISTRY_USER=[my broadleaf username] \
BLC_REGISTRY_PASSWORD=[my broadleaf password] \
BLC_REGISTRY_EMAIL=[my broadleaf registry email] \
BLC_CLOUD_SQL_USERNAME=broadleaf \
BLC_CLOUD_SQL_PASSWORD=broadleaf \
BLC_CLOUD_SQL_DB=broadleaf \
./install.sh -e qa -c cloud -n true|
Note
|
from an empty cluster, you can expect about 8-10 minutes for the full stack to become fully provisioned |
The following describes the steps necessary to configure ingress into the Microservices stack deployed above so that it is accessible to the outside. In reality, this can be highly dependent on your implementation goals and how you intend to use these services.
For the purposes of this tutorial, we’re going to be exposing certain backend services using an Nginx Ingress (however you can choose to configure whatever ingress you wish). In additon, we’re not going to discuss how you handle SSL certs as that can be highly dependent on how you manage your DNS as well. So for the purposes of this tutorial, we’re just going to be using the "default fake SSL cert" provided by the Nginx Controller.
|
Tip
|
Consider using something like https://cert-manager.io/docs/installation/kubernetes/ to manage your certs for your implementation when considering handling SSL |
Install the Nginx Controller
Depending on your cloud, follow the appropriate instructions to install the Nginx Controller on your K8 cluster: https://kubernetes.github.io/ingress-nginx/deploy/
kubectl apply -f https://raw.githubusercontent.com/kubernetes/ingress-nginx/controller-v0.35.0/deploy/static/provider/cloud/deploy.yamlkubectl apply -f https://raw.githubusercontent.com/kubernetes/ingress-nginx/controller-v0.44.0/deploy/static/provider/cloud/deploy.yamlConfigure the Ingress Routes
Example ingress.yaml
apiVersion: extensions/v1beta1
kind: Ingress
metadata:
  name: mydomain-test-ingress
  annotations:
    kubernetes.io/ingress.class: nginx
    nginx.ingress.kubernetes.io/proxy-body-size: 20m
spec:
  rules:
    - host: '*.mydomain-test.com'
      http:
        paths:
          - path: /
            backend:
              serviceName: commercegateway
              servicePort: 8456
    - host: admin.mydomain-test.com
      http:
        paths:
          - path: /
            backend:
              serviceName: admingateway
              servicePort: 8446
    - host: solr.mydomain-test.com
      http:
        paths:
          - path: /
            backend:
              serviceName: solr
              servicePort: 8983
    - host: grafana.mydomain-test.com
      http:
        paths:
          - path: /
            backend:
              serviceName: kube-prometheus-stack-grafana
              servicePort: 80
    - host: prometheus.mydomain-test.com
      http:
        paths:
          - path: /
            backend:
              serviceName: kube-prometheus-stack-prometheus
              servicePort: 9090
    - host: kibana.mydomain-test.com
      http:
        paths:
          - path: /
            backend:
              serviceName: kibana-kibana
              servicePort: 5601
Once you’ve created your ingress definition, go ahead and apply it to your cluster:
kubectl apply -f ingress.yamlConfigure your DNS or change your /etc/hosts
Now we need to get the external IP address from your ingress:
kubectl get ingressShould output something like:
NAME                    HOSTS                                                     ADDRESS       PORTS     AGE
mydomain-test-ingress   *.mydomain-test.com,admin.mydomain-test.com + 4 more...   XX.XX.XX.XX   80, 443   1d
Record the ADDRESS and either configure your DNS provider to point your domain to this address or locally change your /etc/hosts file.
That’s It!
You should now be able to hit the broadleaf demo stack on your cluster via a browser!
As you begin deploying resources to different environments, it is often times useful to "start from scratch" in order to easily test new or different configurations, domains, etc… as you hone your final environment configuration (i.e. having an easy clean install process similar to that of a local environment)
In order to do a full uninstall (k8 resources + data), you should:
Run the ./uninstall.sh script provided by the Helm Charts starter project. This script will remove all resources that were provisioned with the initial ./install.sh script. After running this, it will essentially leave you with an empty Kubernetes cluster (except any ingress that you manually applied) so that you can re-install the stack again.
Next, you will also want to delete the data in the Cloud SQL database as any previous installation may have inserted default seed data (that is tied to old configuration). In order to do this you can run the following on your DB:
DELETE FROM databasechangelog;
DELETE FROM databasechangeloglock;

DROP SCHEMA adminnavigation CASCADE;
DROP SCHEMA adminuser CASCADE;
DROP SCHEMA asset CASCADE;
DROP SCHEMA auth CASCADE;
DROP SCHEMA campaign CASCADE;
DROP SCHEMA cart CASCADE;
DROP SCHEMA "catalog" CASCADE;
DROP SCHEMA customer CASCADE;
DROP SCHEMA import CASCADE;
DROP SCHEMA indexer CASCADE;
DROP SCHEMA inventory CASCADE;
DROP SCHEMA menu CASCADE;
DROP SCHEMA metadata CASCADE;
DROP SCHEMA notification CASCADE;
DROP SCHEMA offer CASCADE;
DROP SCHEMA "order" CASCADE;
DROP SCHEMA personalization CASCADE;
DROP SCHEMA pricing CASCADE;
DROP SCHEMA sandbox CASCADE;
DROP SCHEMA scheduledjob CASCADE;
DROP SCHEMA "search" CASCADE;
DROP SCHEMA tenant CASCADE;
DROP SCHEMA vendor CASCADE;
etc...In some cases, it’s useful to have "drop first" functionality to support cases like ephemeral dev environments where you can start from a clean baseline schema. In these scenarios, you can configure liquibase to DROP FIRST for every deployment. In order to set this up for your environment, you should:
Pass in the following ENV properties for the AUTH container:
- name: SPRING_LIQUIBASE_DROPFIRST
  value: "true"
Configure the following ENV properties for the appropriate Flex Package containers (i.e. min, browse, etc…):
- name: BROADLEAF_ADMINNAVIGATION_LIQUIBASE_DROPFIRST
  value: "true"
- name: BROADLEAF_ADMINUSER_LIQUIBASE_DROPFIRST
  value: "true"
- name: BROADLEAF_ASSET_LIQUIBASE_DROPFIRST
  value: "true"
- name: BROADLEAF_CAMPAIGN_LIQUIBASE_DROPFIRST
  value: "true"
- name: BROADLEAF_CART_LIQUIBASE_DROPFIRST
  value: "true"
- name: BROADLEAF_CATALOG_LIQUIBASE_DROPFIRST
  value: "true"
- name: BROADLEAF_CUSTOMER_LIQUIBASE_DROPFIRST
  value: "true"
- name: BROADLEAF_DATAIMPORT_LIQUIBASE_DROPFIRST
  value: "true"
- name: BROADLEAF_INDEXER_LIQUIBASE_DROPFIRST
  value: "true"
- name: BROADLEAF_INVENTORY_LIQUIBASE_DROPFIRST
  value: "true"
- name: BROADLEAF_MENU_LIQUIBASE_DROPFIRST
  value: "true"
- name: BROADLEAF_METADATA_LIQUIBASE_DROPFIRST
  value: "true"
- name: BROADLEAF_NOTIFICATION_LIQUIBASE_DROPFIRST
  value: "true"
- name: BROADLEAF_OFFER_LIQUIBASE_DROPFIRST
  value: "true"
- name: BROADLEAF_ORDER_LIQUIBASE_DROPFIRST
  value: "true"
- name: BROADLEAF_PERSONALIZATION_LIQUIBASE_DROPFIRST
  value: "true"
- name: BROADLEAF_PRICING_LIQUIBASE_DROPFIRST
  value: "true"
- name: BROADLEAF_SANDBOX_LIQUIBASE_DROPFIRST
  value: "true"
- name: BROADLEAF_SCHEDULEDJOB_LIQUIBASE_DROPFIRST
  value: "true"
- name: BROADLEAF_SEARCH_LIQUIBASE_DROPFIRST
  value: "true"
- name: BROADLEAF_TENANT_LIQUIBASE_DROPFIRST
  value: "true"
- name: BROADLEAF_VENDOR_LIQUIBASE_DROPFIRST
  value: "true"
#etc..